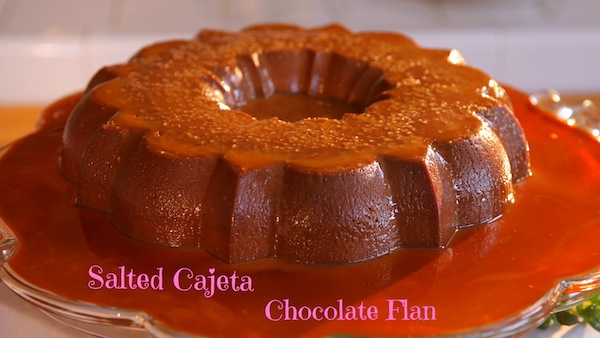
Webisode 6: Salted Cajeta Chocolate Flan
Ever fall hopelessly head over heels in love with flan? The type of love where you have tunnel vision, and all your surroundings just fade to black because all you could think about is your flan? I had it bad, I was MAD…. as in madly smitten with the sweet and salty cajeta drenched chocolate flan that I had to do something grandiose as a gesture of my amor. I made this video so lovers around the world could unite and find themselves in the arms of a delicious flan! HAPPY VALENTINE’S DAY!
Ingredients for Salted Cajeta Chocolate Flan:
- Non- stick baking spray
- 1/2 – cup cajeta
- 1 – 7.6 ounce Nestle’s Media Crema
- 12 – ounce semisweet chocolate chips
- 5 – large eggs
- 4 – ounces of cream cheese (room temperature)
- 1 – 14 ounce can of Nestle’s La Lechera Sweetened Condensed Milk
- 1 – 12 ounce can of evaporated milk
- 1 – tablespoon vanilla
- sea salt to taste
Directions:
- Spray a 12 cup budnt pan with non stick spray.
- Pour cajeta evenly into bundt pan. Set to the side.
- In a medium sauce pan over a medium flame add Media Crema and chocolate chips and stir until completely melted and smooth. Remove from heat and allow to cool for 15 minutes.
- Add eggs, cream cheese, La Lechera, evaporated milk, and vanilla to a blender. Blend till smooth. Then add in the chocolate mixture and blend till combined.
- Pour flan mixture over the cajeta filled bundt pan.
- Cover the bundt pan with a piece of aluminum foil and place inside a large pyrex baking dish. Pour hot water into the pyrex baking dish to fill up half way.
- Then place the baking dish into the oven and bake for 1 hour.
- Once out of the oven, remove from water bath and uncover to allow cooling. Run a small knife around the edge to ensure it from sticking.
- Let the flan rest for two hours then flip it over onto a plate. Slowly lift pan up away from plate.
- Place in the fridge for 5 hours or overnight.
- Sprinkle top with sea salt right before serving.
- ENJOY!