Month: December 2013

Princess House Tamale Steamer And My Fun Tamalada!

Princess House Tamale Steamer And My Fun Tamalada!

This is part of a sponsored campaign with Latina Mom Bloggers and Princess House.
However, all opinions expressed are my own.

_MG_0732

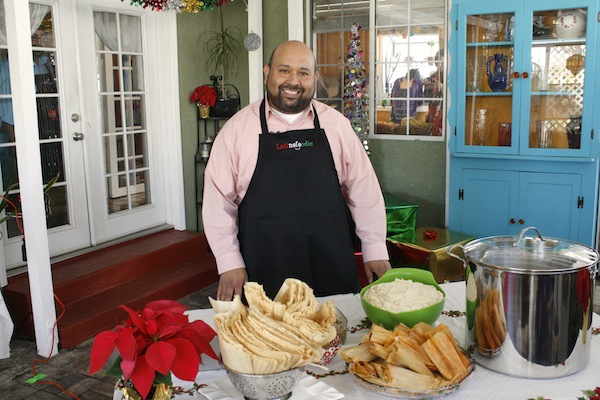
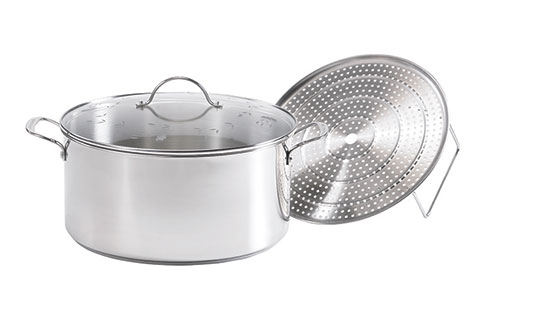
That’s a picture of my friend Stephen…. He and his husband Art co-create a blog called Latino Foodie. Long story short… Stephen and Art came over for dessert at my house at the beginning of November and were going on and on about the tamale steamer/stockpot Princess House makes (pictured above) . Asking me if I had used it before, telling me about the signature crystal princess house lid and how it’s made of vented glass (which means it allows for slow evaporation of liquid when steaming or simmering food), how the whole  pot is made of stainless steel, and has a lifetime guarantee.  We continued exchanging tamale tips, then Stephen said why don’t we have a tamalada here at your house closer to Christmas? I’m always up for a party and with tamales as part of equation… my answer was YES!

1450750_10152036028059836_1933979089_n

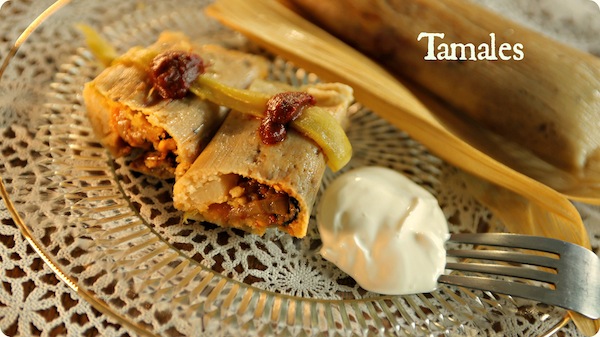
Last week the tamalada happened! Some of my favorite food friends came and spread masa on corn husks and filled them with spicy meat and other delicious filling.

_MG_0734

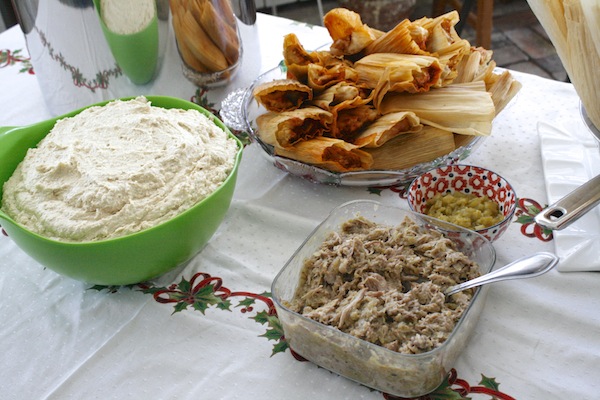
We quickly put the first batch in a Princess House steamer to cook so we could enjoy when we were done preparing all the tamales. Once the food was ready we dove in and celebrated our friendship, culture, and Christmas traditions.

_MG_0759

It was a wonderful time, and none of us will forget it. Princess House was super generous in sending a new tamale steamer home with each one of my tamale spreading friends. From this point forward… every time one of us makes tamales, we will pull out our tamale steamers and remember our bonding day fondly.

999456_623724097689327_430682172_n

Here is a picture of the lovely 18 qt. Princess House Stockpot/ Steamer everyone got!

6314_15Qt_Silo-PrincessHouse


For more on tamales… check out my tamale video by clicking here!

tamlespres


Food Craft: How To Build A Candy Christmas Tree

Food Craft: How To Build A Candy Christmas Tree

xmas

Here’s the skinny… My mom and Auntie Rosie have been on a crafting roll lately…. Every time I check in with my Mom she goes on and on telling me about the candy wreaths her and my aunt have been making, if that’s not enough she’s even sending pictures and blowing up my instagram feed with her crafty creations. I have to admit…. I was a little jealous I couldn’t join them due to an over abundance of work this year. Usually I’m in the thick of the craft projects with them.

A few days later my Mom and I were doing our weekly run to Walmart for all things needed, and she says to me “Are you sure you don’t have time to make a candy tree? We could buy everything here at Walmart, then go home and make some. It won’t take that long.” I got so happy, I smiled and said “Alright. Twist my arm to spend some quality Mom and daughter time making food crafts!” She new I was bummed and was dying to get crafty…. plus I knew I could always share / blog about it.

Once my tree was done, I thought it to be so whimsical and old fashioned at the same time. I imagined it being part of the set of an old Rudolph cartoon with a blaze of snow blowing past it. My Mom and I placed our trees side by side when we were done and photographed them. She made her’s covered in gummy bears and I made mine of sour cherry candies with a white star on top. HAPPINESS = A MERRY CHRISTMAS

_MG_0005

What you’ll need for a Candy Christmas Tree:

  • glue sticks
  • glue gun
  • styrofoam cone
  • styrofoam circle stand / base for cone (optional)
  • green tape (or any other color that suits your needs)
  • candy
  • sequins ribbon (optional)
  • craft stars
  • garland / tinsel
  • scissors

Instruction:

  1. Plug in glue gun and insert glue stick…allow to get hot.
  2. Glue base/stand to styrofoam cone.  _MG_0013_MG_0017
  3. Working in 2 to 3 inch long pieces, cover the cone from top to bottom in tape. _MG_0022
  4. Once the entire cone is covered, tape up the bottom and top too.
  5. Using little dabs of glue from the glue gun, stick on the first piece of candy. Work your way all around to form the first ring. _MG_0032
  6. Then measure the circumference of the tree with the sequin ribbon. Cut where the two ends meet and glue it on between each roll of candy rings. _MG_0036
  7. Once you reach the bottom glue the garland / tinsel around the bottom of the base. _MG_0039
  8. Either glue the star directly on top of the tree or I used pom pom balls between the tree and the star.
  9. It’s that simple.
  10. Enjoy!

Walmart-Mom2-Disclosure2

Princess House Cookin’ Kids!

Princess House Cookin’ Kids!

_MG_0554

I got a little guy who watches his Mama cook day in and day out. He examines my every move in the kitchen and has recently started asking to be involved. He wants to bake, make pancakes, or pour hot water in jello….all under Mama’s watchful eye of course. This is all music to my ears that I have a little chef in the works here who shows a genuine interest in cooking. I am even more thrilled that Princess House now has wonderful kits that kids can use and actually help out in the kitchen. You can find everything from an apron to mixing bowls to a real whisk to cookie cutters. My son and I have been getting busy in the kitchen…cookie making and whipping up cake batter. He loves it, and so do I. Here are a few pictures of us having fun in the kitchen. Get your little chef a Princess House Cookin’ Kid  kit today!

_MG_0329

_MG_0565

_MG_0586

MKKK1

A Video Christmas Card To All My Friends!

A Video Christmas Card To All My Friends!

EAT3

I’m totally behind in LIFE these days!  I haven’t even had a chance to grab Christmas cards to send out this year.  So due to this, here is a little Christmas video to all my friends and family.  Merry Christmas!

Click here:

Pour Me Some Ponche!

Pour Me Some Ponche!

ponche

Do you ever make things in advance to try them out? You know, like try a recipe a few weeks in advance before a party. I’m a little crazy like that. Well I don’t know if you can call it crazy…. I like to think of it as uber prepared. That happened this past weekend. It had been a year since the last time I made ponche, I make it annually but like to change little things here and there each year.  I think the truth of the matter is I was looking for a reason to make ponche, and Walmart tempted  me further by having everything I needed to make it right there in the store. As I walked down the isles I filled my cart up with apples, prunes, raisins, sugar cane, and tamarindo. I told myself as I pushed the cart that I was gonna have my Christmas party / posada in a few weeks and I had to give my ponche recipe a spin. That was enough to convince me, as everyone knows you can not have a posada without a good pot of ponche. Next thing I knew I was home peeling my tamarindo pods and coring my apples. A few hours later my house smelled of Christmas…. the weather was cold outside and my hands warm wrapped around my gorgeous ponche.

ingreds

Ingredients for ponche:

  • 2 – gallons water
  • 15 – tamarindo pods (peeled and devein)
  • 18 – dried hibicus flowers
  • 4 – cinnamon sticks
  • 20 – tejocote
  • 5 – apples (cut in half and cored)
  • 15 – guavas
  • 1/2 – cup raisins
  • 20 – prunes (pitted)
  • 3 – piloncillo cones

Directions:

  1. Peel and devein tamarindo. _MG_0822
  2. Cut apples in half and core.
  3. Place all ingredients in a large pot over a high flame and bring to a boil. _MG_0841
  4. When the mixture starts to boil,  lower flame to low/simmer and cover with a lid.
  5. Cook for 3 hours. _MG_0936
  6. Remove from flame and serve hot. _MG_0950
  7. Enjoy!

Here is a little snippet of how to devein a tamarindo pod.

Walmart-Mom2-Disclosure2

Easy Food Craft: Decorating With A Gingerbread House

Easy Food Craft: Decorating With A Gingerbread House

MerryXmas

Sometimes, just sometimes life hands over a project that is usually hard and makes it so simple you have to do it.  Allow me to start by saying I have been making gingerbread house every year since me and my fiance got together. Initially (over 11 years ago) I had started by doing the whole thing from scratch, but for some reason one of the walls wouldn’t fit perfectly or it would crack. Then a few years later I found a kit where all the pieces came in the box, and you could assemble the house when you got home with a little help from some royal icing. This year I was strolling around Walmart buying some supplies for some posts among other things, and saw a mountain of gingerbread houses for sale. These were no ordinary gingerbread houses….. these were pre-assembled for you. I quickly threw an arm full of boxes in the cart and said to my fiance…. we have to make a few  gingerbread houses now. Then I tilted my head to the candy isle to go find some supplies to further decorate my house. YES, the box comes with candy and royal icing in it, but I wanted to get a little more fancy with it. Can I just say WALMART has the BEST candy isle EVER! I love all the holiday candy they carry. Among the chocolates and chewy fruit candies I found a cute peppermint candy tree (It was only $1.50, I don’t know why I didn’t buy more) … I knew it was going to look fabulous in front of my gingerbread house.

Tips for making a gingerbread house:

  • Construct on a plate or dish that the house will live on. That way you can move it around during the holidays to fit your needs.
  • I like to use cereal (frosted mini wheats) as the roof.
  • Break to candy canes together to form a heart, then place them on a piece of wax paper and bake for 3 minutes at 350 degrees fahrenheit. Then peel the hearts off and use them as you wish. I used mine as a huge window this year.
  • If you make several you can give them away as centerpieces for the holidays. Or take it with you to a holiday party as a gift for the host.
  • I sometimes put a round mirror in the front of the house to create an illusion of a  frozen patch of water.
  • I cover the plate in shredded coconut to make it look like a snow covered ground.
  • Cut pieces of candy to fit the length of the roof or walls.
  • Choose a color theme and buy the kind of candy that will help accomplish the look you want.

_MG_0764 _MG_0765_MG_0818 _MG_0768

_MG_0812

_MG_0807

Here is a little instagram of my finished gingerbread house:

xmasHouse

Walmart-Mom2-Disclosure2

Loaded Mashed Potatoes

Loaded Mashed Potatoes

loadedMashedpo

I seriously pride myself on being a potato girl. I never shy away from my favorite carb, nor do my boys. I believe Mando’s first word was “papa” and he wasn’t making reference to his father. My son follows closely in his dad’s footsteps, asking for potatoes with every meal. It’s kinda funny, the times we have been out at a Chinese or Japanese restaurant and my son tries to order french fries, that’s a true sign of a potato lover. There are so many varieties of potatoes in the US, and I have tried a great deal of them.

_MG_0650Not long ago Walmart asked me to try a new potato by the name of Albert Bartlett Rooster Potato, which up until now have only been sold in the United Kingdom. This potato starts off with pink skin and cooks golden yellow, and it is only sold exclusively to Walmart here in the United States. I quickly investigated this product to see what they were all about, and they only cost $2.87 for a 2 pound bag at my local Walmart . With promises of being buttery, nutty, and fresh I had to give them the old Presley try. I examined the packaging and found that this potato is very versatile. You can roast, mash, bake, fry, and boil it…. not quite in that order but you get the picture.  I decided since I don’t have a good mashed potato recipe on my blog, I would try my hand at this recipe. Enjoy it at your holiday table. Enjoy!

_MG_0679

Ingredients for loaded mashed potatoes:

  • 6 to 8 – Albert Bartlett Rooster potatoes (peeled and cut into 4 pieces per potato)
  • 1 – stick butter (sliced)
  • 3 – tablespoons sour cream
  • salt to taste
  • 2 – cups grated cheddar cheese
  • 1 – cup bacon (cooked and crumbled)
  • 1/2 – cup green onion (chopped)

Directions:

  1. In a pot filled halfway with water over a medium flame, bring water to a boil. Meanwhile peel and cut potatoes. _MG_0674
  2. Add in potatoes and cook in boiling water for 15 minutes. _MG_0667
  3. Remove from flame and drain out water.
  4. Smash potatoes with a masher and add in butter and sour cream, continue mashing until smooth. _MG_0689
  5. Salt to your liking.
  6. Gently fold in 1 1/2 cups grated cheddar cheese.
  7. Next mix in bacon and green onion. Continue mixing until fully combined. _MG_0693
  8. Pour the mashed potato mixture into a casserole dish, and sprinkle the top with remaining cheddar cheese.
  9. Place under the boiler on high for 5 to 7 or until crisp.
  10. Enjoy!

Walmart-Mom2-Disclosure2