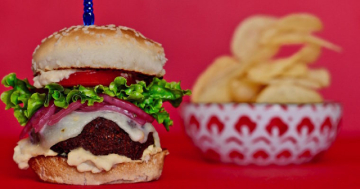
Recent Posts

Chicken Pita Pocket

Chicken Pita Pocket

This is the reason my son stopped, skipping lunch, he fell in love with this chicken pita pocket! What makes it special is: I whip real California cottage cheese and jalapeños to make a creamy protein packed dressing that is so delicious you will want to lick it off the spoon. I use the whipped spicy cottage cheese in place of any other condiments because it’s that good. Then pack the pita with shredded lettuce, a slice of Real California cheddar, grilled chicken, crispy bacon, a nice big slice of tomato, a few slices of nectarine for sweetness and red onion. So many layers of flavor. I call it ‘lunch that fuels’ my son says it’s GAS.

When choosing ingredients for my family I look for the Real California Milk Seal for products that are wholesome, delicious, and come in many varieties at a great value. The truth is these are the quality products I trust and love, and that’s why this pita gets household approval because I’m using products stamped with the Real California Milk Seal!  #RealCaliforniaMilk #RealCaliforniaMilkPartner

Grilled Chicken Pita Pocket

Prep Time: 5 min
Cook Time: 15 min
Yields: 2 servings

Ingredients

For the Pita Pocket:

  • 2  soft pita pocket
  • 4 small red leaf lettuce leaves, shredded
  • 2 Real California Cheddar cheese, slices
  • 4 slices thick-cut bacon
  • 4 – 6 thin slices ripe nectarine
  • 2 slices tomato
  • A few thin slices red onion

For the Grilled Chicken:

  • 2 small chicken breasts (about 10 oz)
  • 2 tsp olive oil
  • 1/2 tsp smoked paprika
  • 1/4 tsp garlic powder
  • Pinch of salt & pepper
  • Juice of 1 lime wedge

For the Jalapeño Cottage Cheese Dressing:

  • 1 cup Real California cottage cheese
  • 1 pickled jalapeño
  • 1 tsp jalapeño brine (optional)
  • Pinch of salt

Instructions

1. Grill the Chicken

  1. Flatten or butterfly the chicken breast for even cooking.
  2. Rub with olive oil, paprika, garlic powder, salt, and pepper.
  3. Grill over medium-high heat for 5–6 minutes per side, or until internal temp hits 165°F .
  4. Rest for 5 minutes, then slice thinly.

2. Cook the Bacon

  1. In a skillet over medium heat, cook 4 slices of bacon until crispy — about 4–5 minutes per side.
  2. Drain on paper towels and break into halves.

3. Make the Dressing

  1. Blend Real California cottage cheese, jalapeño, brine (if using), and a pinch of salt until smooth and creamy.

4. Assemble the Pita

  1. Warm pita (microwave 15–20 seconds or heat in foil at 300°F for 5 minutes).
  2. Open pita and spread the inside of pita with Jalapeno Cottage Cheese dressing then layer in:
    • Shredded lettuce
    • 1 slice Cheddar
    • Sliced grilled chicken
    • 2 full slices bacon
    • Nectarine, tomato, and onion slices
  3. Dip or drizzle top of pita with more jalapeño cottage cheese dressing.

Get inspired by more recipes using dairy products at:

https://www.realcaliforniamilk.com/recipes

¿Sabes por qué mi hijo ya no se salta la comida?
¡Porque se enamoró de este pan pita con pollo!Le pongo una cremita mágica: queso requeson Real California con jalapenos. ¡Sabe tan rico que quiere chupar la cuchara!

En vez de mayonesa, uso esa crema.
Después le meto lechuga, queso cheddar Real California, pollo asado, tocino crujiente, jitomate, nectarina dulce y cebollita morada. ¡Tiene muchos sabores y lo llena de energía!
Yo le digo “comida poderosa”, él dice que está ¡uff, buenísima!

Cuando se trata de cocinar para mi familia, siempre busco el sello de Real California Milk—productos nutritivos, deliciosos, de calidad, y con muchas opciones a un gran precio.
La verdad, son productos en los que confío y que me encanta

Pan Pita con Pollo a la Parrilla

Tiempo de preparación: 5 min

Tiempo de cocción: 15 min

Rinde: 2 porciones

Ingredientes:

Para el pan pita:

  • 2 pan pita blandos
  • 4 hojas pequeñas de lechuga roja, rallada
  • 2 rebanadas de queso cheddar Real California
  • 4 rebanadas de tocino grueso
  • 4-6 rebanadas finas de nectarina madura
  • 2 rebanadas de tomate
  • Unas rebanadas finas de cebolla morada

Para el pollo a la parrilla:

  • 2 pechugas de pollo pequeñas (aprox. 280 g)
  • 2 cucharaditas de aceite de oliva
  • 1/2 cucharadita de pimentón ahumado
  • 1/4 cucharadita de ajo en polvo
  • Una pizca de sal y pimienta

Para el aderezo de queso cottage y jalapeño:

  • 1 taza de queso cottage Real California
  • 1 jalapeño encurtido
  • 1 cucharadita de salmuera de jalapeño (opcional)
  • Una pizca de sal

Instrucciones

Asar el pollo:

  1. Aplanar o abrir la pechuga de pollo en mariposa para una cocción uniforme.
  2. Untar con aceite de oliva, pimentón, ajo en polvo, sal y pimienta.
  3. Asar a fuego medio-alto de 5 a 6 minutos por lado, o hasta que la temperatura interna alcance los 74 °C.
  4. Dejar reposar 5 minutos y luego cortar en rebanadas finas.

Cocinar el tocino

  1. En una sartén a fuego medio, cocinar 4 rebanadas de tocino hasta que estén crujientes, aproximadamente de 4 a 5 minutos por lado.
  2. Escurrir sobre papel absorbente y partir por la mitad.

 Preparar el aderezo

1. Licuar el queso cottage Real California, el jalapeño, la salmuera (si se usa) y una pizca de sal hasta obtener una mezcla suave y cremosa.

Armar el pan pita

  1. Calentar el pan pita (calentarlo en el microondas de 15 a 20 segundos o en papel aluminio a 150 °C durante 5 minutos).
  2. Abra el pan pita y unte el interior con aderezo de queso cottage y jalapeño. Luego, añada:
  3. Lechuga rallada
  4. 1 rebanada de queso cheddar Real California
  5. Pollo a la parrilla en rebanadas
  6. 2 rebanadas enteras de tocino
  7. Rodajas de nectarina, tomate y cebolla
  8. Rocíe o sumerja la parte superior del pan pita con más aderezo de queso cottage y jalapeño.

Inspírate con más recetas ricas de productos lácteos:

https://www.realcaliforniamilk.com/es/rec

Concha Breakfast Sandwich

Concha Breakfast Sandwich

If you’ve never had a breakfast sandwich made in a concha, are you even living? Says my teenage son…. Usually followed with a request for me to make him two Concha Breakfast Sandwiches…. If your teenage kid is anything like mine… he doesn’t eat lunch at school , so making sure he’s well fed first thing in the morning is my main goal. Back to school means pulling out all the stops and whipping up something delicious that will carry him through his day.

Cooking the eggs in Real California butter, then folding it in half and topping them with real California cheddar…. I use a white or yellow concha, a thin spread of mayo, top with cheesy eggs,  a tangle of bacon, place the decorative concha half on top, slice it down the middle and we are set to goooooo!

I look for the Real California Milk seal for products that are nutritious, delicious, and come in many varieties and styles.

Concha Breakfast Sandwich:

Prep: 5 minutes

Cook: 15 minutes

Yields: 1

Ingredients:

  • 3- 5 slices cooked bacon (crispy)
  • 2 large eggs
  • 1 tablespoon Real California butter
  • Salt and pepper to taste
  • 2 slices Real California cheddar cheese
  • 1 concha (Mexican sweet bread), yellow or white
  • Optional: mayo

Instructions:

  1. Cook the bacon in a skillet over medium-low heat, cook the bacon until crispy (about 4–5 minutes per side). Transfer to a paper towel–lined plate to drain excess grease.
  2. Crack the eggs into a bowl, season with a pinch of salt and pepper, and beat with a fork until fully mixed. In a nonstick pan over medium-low heat, melt the butter. Pour in the eggs and let them sit for a minute. Then gently pull the edges away with a spatula, pushing from the edges toward the center. Cook until the eggs are just set then flip the egg to the other side and cook for another minute or so. Fold the egg in half and place both slices of cheese on egg and allow the cheese to melt a bit by covering pan with a lid.
  3. Slice the concha in half lengthwise. Spread both halves with a thin layer of mayo.
  4. Assemble the Sandwich by adding the eggs on the bottom half of the concha. Layer on the crispy bacon. Top the other half of the concha.

Get inspired by more delicious recipes using dairy products at:

https://www.realcaliforniamilk.com/recipes

Si nunca has probado un sándwich de desayuno hecho en una concha, ¿acaso estás vivo?, dice mi hijo adolescente… Y suele seguir pidiéndome que le prepare dos sándwiches de desayuno de concha… Si tu hijo adolescente se parece al mío… no almuerza en la escuela, así que asegurarme de que esté bien alimentado a primera hora de la mañana es mi principal objetivo. Volver a la escuela significa darlo todo y preparar algo delicioso que le acompañe durante el día.

Cocinar los huevos con mantequilla Real California, luego doblarla por la mitad y cubrirlos con queso cheddar Real California… Yo uso una concha blanca o amarilla, una capa fina de mayonesa, los cubro con huevos con queso, una montania de tocino, coloco la mitad decorativa de la concha encima, la corto por la mitad, ¡y listo!

Yo siempre busco el sello de Real California Milk en los productos que son nutritivos, deliciosos y vienen en muchas variedades y estilos.

Sándwich de desayuno Concha:

Preparación: 5 minutos

Cocción: 15 minutos

Ración: 1

Ingredientes:

• 3-5 rebanadas de tocino cocido (crujiente)

• 2 huevos grandes

• 1 cucharada de mantequilla Real California

• Sal y pimienta al gusto

• 2 rebanadas de queso cheddar Real California

• 1 concha (pan dulce mexicano), amarilla o blanca

• Opcional: mayonesa

Instrucciones:

1. Cocina el tocino en una sartén a fuego medio-bajo hasta que esté crujiente (aproximadamente de 4 a 5 minutos por lado). Transfiere a un plato forrado con papel absorbente para escurrir el exceso de grasa.

2. Casca los huevos en un tazón, sazona con una pizca de sal y pimienta y bate con un tenedor hasta que estén bien mezclados. En una sartén antiadherente a fuego medio-bajo, derrite la mantequilla. Vierte los huevos y déjalos reposar un minuto. Luego, retira suavemente los bordes con una espátula, empujando desde los bordes hacia el centro. Cocina hasta que los huevos estén cuajados, luego voltéalos y cocina durante aproximadamente un minuto más. Dobla el huevo por la mitad y coloca las dos rebanadas de queso sobre él. Deja que el queso se derrita un poco tapando la sartén.

3. Corta la concha por la mitad a lo largo. Unta ambas mitades con una capa fina de mayonesa.

4. Arma el sándwich colocando los huevos en la mitad inferior de la concha. Cubre con el tocino crujiente. Cubre la otra mitad de la concha.

Inspírate con más recetas que utilizan productos lácteos:

https://www.realcaliforniamilk.com/es/recipes

Smoked Queso

Smoked Queso

When backyard smoke meets Real California dairy, you get Smoked Queso—a bold, melty, flavor-packed dip that’s MADE with National Grilling Month in mind. This isn’t just a snack—it’s an open invitation to gather your favorite people and #snackhappy!

What makes it next-level? Real California cheddar, Monterey Jack, and cream cheese—smoked low and slow with spicy chorizo, pickled jalapeños, and juicy tomatoes. It’s creamy, smoky, a little spicy, and completely irresistible right off the grill.

I look for the Real California Milk seal for products that are nutritious, delicious, and come in many varieties and styles. When you start with quality dairy, you end up with next-level queso.

Smoked Queso

Prep: 10 minutes

Grill Time: 2 hours

Yields: 6 to 8 servings

Ingredients:

  • 1 lb. pork chorizo, cooked and drained of grease
  • 2 garlic cloves, minced
  • 16 oz. Real California mild cheddar cheese, cubed or grated
  • 16 oz. Real California Monterey Jack cheese, cubed or grated
  • 8 oz. Real California cream cheese, cubed
  • 3 ripe tomatoes, chopped
  • ¾ cup white onion, chopped
  • 5–7 pickled jalapeños, sliced (adjust to taste)
  • ½ cup Real California half-and-half (optional, for thinner queso)

 Instructions

  1. Load the smoker with lump charcoal and light it. Let it come up to temperature gradually.
  2. Add 2-3 hickory chunks for long, steady smoke. (optional)
  3. Insert the plate setter or heat deflector for indirect heat.
  4. Stabilize temperature between 225°F–250°F.
  5. Cook the chorizo in a skillet over medium heat until browned. Drain most of the grease. Set aside.
  6. In your cast iron skillet or foil pan, layer the ingredients in this order: Cubed cheddar and Monterey Jack, cubed cream cheese, chopped tomatoes, chopped onions, minced garlic, diced pickled jalapeños, and cooked chorizo.
  1. Place the entire pan uncovered into the smoker on the indirect grate.
  2. Smoke at 225–250°F for 1 to 2 hours.
  3. Stir the queso every 30 minutes to help it melt evenly and absorb smoke flavor. (Use gloves and a long-handled spoon.)
  4. If the queso is too thick near the end, stir in Real California half-and-half ¼ cup at a time until you reach desired consistency.
  5. Once the cheese is fully melted and the queso has a smooth consistency (1.5 to 2 hours), remove from the smoker.
  6. Stir thoroughly, then serve hot from smoker to table with tortilla chips, or chicharrones.

Tip: Leftovers can be refrigerated and reheated with a splash of milk or cream.

Get inspired by more delicious recipes using dairy products at:

https://www.realcaliforniamilk.com/recipes

Find a delicious smoked mushroom quesadilla here!

Cuando el humo del asador se mezcla con lácteos de verdad de California, nace el Queso Ahumado: un dip atrevido, cremoso y lleno de sabor, hecho pensando en el Mes Nacional de la Parrillada. Esto no es solo un antojo—es una invitación abierta para reunir a tus personas favoritas y comear feliz.

¿Qué lo hace realmente especial? Queso cheddar, Monterey Jack y queso crema de California, todos ahumados a fuego lento con chorizo picante, jalapeños en escabeche y tomates jugosos. Es cremoso, ahumado, un poco picante y completamente irresistible directo del asador.

Yo siempre busco el sello de Real California Milk en los productos que son nutritivos, deliciosos y vienen en muchas variedades y estilos. Cuando comienzas con lácteos de calidad, terminas con un queso ¡de otro nivel!

Queso Ahumado


Preparación: 10 minutos
Tiempo en el asador: 2 horas
Rinde: 6 a 8 porciones

Ingredientes:

• 450 g de chorizo ​​de cerdo, cocido y escurrido

• 2 dientes de ajo, picados

• 450 g de queso cheddar suave Real California, en cubos

• 450 g de queso Monterey Jack Real California, rallado

• 225 g de queso crema Real California, en cubos

• 2 tomates maduros picados

• 3/4 taza de cebolla blanca, picada

• 5 jalapeños encurtidos, rebanados (ajustar al gusto)

• 1/2 taza de crema media y media Real California (opcional, para un queso más ligero)

Instrucciones:

1. Cargue el ahumador con carbón vegetal en trozos y enciéndalo. Deje que alcance la temperatura gradualmente.

2. Añada de 2 a 3 trozos de nogal americano para un ahumado largo y constante (opcional).

3. Inserte el deflector de calor para obtener calor indirecto. 4. Estabilice la temperatura entre 102 °C y 121 °C.

5. Cocine el chorizo ​​en una sartén a fuego medio hasta que se dore. Escurra la mayor parte de la grasa. Reserve.

6. En su sartén de hierro fundido o bandeja de aluminio, coloque los ingredientes en capas en este orden: queso cheddar y pepper jack, queso crema,  tomates picados, cebolla picada, ajo picado, jalapeños encurtidos en cubos, chorizo ​​cocido.

7. Coloque toda la sartén sin tapar en el ahumador sobre la rejilla indirecta.

8. Ahúme a 102 °C y 121 °C durante 1 o 2 horas.

9. Revuelva el queso cada 30 minutos para que se derrita uniformemente y absorba el sabor ahumado. (Use guantes y una cuchara de mango largo).

10. Si el queso está demasiado espeso al final, incorpore media crema California, ¼ de taza a la vez, hasta obtener la consistencia deseada.

11. Una vez que el queso esté completamente derretido y tenga una consistencia suave (1.5 a 2 horas), retírelo del ahumador.

12. Remueva bien y sirva caliente del ahumador a la mesa con totopos o chicharrones.

Consejo: Las sobras se pueden refrigerar y recalentar con un chorrito de leche o crema.

Inspírate con más recetas que utilizan productos lácteos:

https://www.realcaliforniamilk.com/es/recipes

Sweetpotato Ceviche

Sweetpotato Ceviche

This may be my husband’s new favorite, Sweetotato ceviche…. he can’t get enough and has been asking me to make it for him repeatedly. I don’t blame him…. It’s so darn good. Try it for yourself. Serve with banana chips for extra crunch. 🙂

Ingredients:

Sweetpotato sauce:

  • 1 cup sweetpotato, baked, peeled and cubed
  • 1/2 cup lime juice, freshly squeezed
  • 1/2 cup cold water
  • 1 garlic clove, minced
  • 1 teaspoon ginger, grated
  • ½ cup red onion, chopped
  • 1 1/2 teaspoons Ají Amarillo Paste or 1/2 habanero (optional)
  • 1 tbsp fresh cilantro
  • 3/4 teaspoon salt
  • 1/4 teaspoon granulated sugar
  • 2 tablespoons olive oil

Ceviche:

  • 15 medium shrimp, peeled, deveined, and sliced in ½ inch pieces
  • 1/2 cup lime juice, divided
  • ½ cup red onion, thinly sliced
  • ½ cup tomato, chopped
  • 1 small cucumber, deseeded and diced
  • 1/2 red chile or 1 jalapeno
  • 1 tablespoon cilantro, finely chopped
  • Salt, to taste

Directions:

Preheat oven to 400 degrees Fahrenheit. Place a North Carolina Sweetpotato on a baking sheet and bake until fork-tender (about 60 minutes). Let it cool for 20 to 30 minutes, then peel and cube.

In a blender, combine sweetpotato, lime juice, water, garlic, ginger, red onion, ají Amarillo paste, cilantro, salt, and sugar.

Blend on high until very smooth for 2 minutes.

With the blender running on low, slowly drizzle in the olive oil to create a slightly creamy texture.

 Strain for a silkier finish. Chill in the fridge until ready to use.

Ceviche:

Peel and devein shrimp. Pour 1/2 cup lime juice over shrimp mixture, to lightly “cook” the shrimp for 30 minutes in the fridge. Remove from fridge and drain.

In a bowl, mix shrimp, red onion, tomato, cucumber, chili, cilantro, and salt.

Spread or pour Sweetpotato sauce on the bottom of a shallow plate or bowl or cup. Top with Shrimp Ceviche. Garnish with cilantro, Plantain chips, and corn nuts.

Serve immediately, cold.

Strawberry Horchata Tiramisu

Strawberry Horchata Tiramisu

If I had to pick a summer snacking 2025 dessert… it would be: Strawberry Horchata Tiramisu!

This isn’t your typical tiramisu — it’s an horchata de fresa–kissed glow-up that layers flavors of ‘the best summer vacay in Mexico’ into the Italian classic!

First up: horchata-soaked ladyfingers meet a cinnamon-spiced Real California mascarpone cream — creamy, and oh-so-dreamy. Then comes a burst of fresh strawberries, followed by strawberry gelatin-dipped ladyfingers and a mousse-like strawberry cream made with Real California Whipping Cream and Sweetened Condensed Milk.

It’s sweet, tangy, airy, and luxe — crowned with more ladyfingers, whipped cream and a strawberry powder dusting that says, yeah, I’m fancy.

I look for the Real California Milk seal for sustainably sourced quality dairy products that are wholesome, delicious, and come in many varieties at a great value.

Make this recipe for your next sunny-day celebration — or whenever you need a little taste of summer magic.

Strawberry Horchata Tiramisu:

Prep Time: 45 minutes

Cooling/Resting Time: 1 hour room temp + 4 hours chilling

Yield: 12 to 15 servings

Ingredients:

·      12 oz. Strawberry gelatin powder

·      3 cups boiling hot water

·      60 Ladyfingers, (divided into 3 groups of 20)

·      4 cups horchata, divided

·      24 oz. Real California Mascarpone

·      1 ½ cups powdered sugar

·      1 ½ cups strawberries, chopped

·      5 cups Real California Whipping Cream, divided

·      14 oz. Real California Sweetened Condensed Milk

·      3/4 cup sugar, divided

·      1 oz. freeze dried strawberries, crusted into powder

·      10 Whole strawberries to garnish (optional)

Directions:

In a mixing bowl, dissolve the strawberry gelatin powder in hot water. Stir until completely dissolved. Set aside and let cool to room temperature (about 1 hour).

Pour 1 ½ cups horchata into a tall, slender cup. Quickly dip 20 ladyfingers into the horchata and line the bottom of a 13×9-inch glass dish with them.

In a large bowl, whip together Real California mascarpone, powdered sugar, and 1 cup horchata on high speed until light and airy.
Spread the mascarpone mixture evenly over the soaked ladyfingers.

Evenly distribute chopped strawberries over the horchata mascarpone layer.

Pour 2 cups of the cooled strawberry gelatin into a tall cup. Quickly dip another 20 ladyfingers and place them in a single layer over the strawberries.

Whip 2 cups of Real California whipping cream on high for 2 minutes until soft peaks form.
Drizzle in Real California sweetened condensed milk, then continue whipping until fully incorporated.
Slowly drizzle in 1 cup of the room temperature strawberry gelatin and whip for an additional minute, until light and fluffy.
Spread this strawberry cream mixture evenly over the gelatin-dipped ladyfingers.

Pour the remaining 1 ½ cups of horchata into a tall cup. Dip the final 20 ladyfingers quickly and layer over the strawberry cream.

Whip 3 cups of Real California whipping cream on high speed for 2 minutes until soft peaks form.
Add ¾ cup sugar and continue whipping for 1 more minute.
Reserve 1 cup of the whipped cream for piping.
Spread the remaining whipped cream evenly over the final layer of ladyfingers.

Dust top of whipped cream with freeze-dried strawberry powder.

Place the reserved whipped cream into a piping bag and pipe decorative puffs over the surface.
Garnish with fresh strawberries on top of the puffs.

Refrigerate for at least 4 hours before slicing and serving.

Find all the dairy ingredients for this Strawberry Horchata Tiramisu here: https://www.realcaliforniamilk.com/en/product-locator

Si tuviera que escoher un postre para el verano de 2025… ¡sería: Tiramisú de Horchata de Fresa!

Este no es el típico tiramisú: ¡es una versión revitalizante con un toque de horchata de fresa que combina sabores de “las mejores vacaciones de verano en México” con el clásico italiano!

Primero: bizcochos de soletilla bañados en horchata con una crema de mascarpone Real California con canela: cremosa y deliciosa. Luego viene una explosión de fresas frescas, seguida de bizcochos de soletilla bañados en gelatina de fresa y una crema de fresa tipo mousse hecha con crema batida Real California y leche condensada azucarada.

Es dulce, ácido, ligero y lujoso, coronado con más bizcochos de soletilla, crema batida y un toque de fresa en polvo que dice: “¡Sí, soy elegante!”. Busco el sello de Real California Milk para productos lácteos de calidad, de origen sostenible, saludables, deliciosos y con una gran variedad a un precio excelente.

Prepara esta receta para tu próxima celebración en un día soleado, o cuando necesites un poco de la magia del verano.

Tiramisú de Horchata de Fresa

Tiempo de preparación: 45 minutos

Tiempo de enfriado y reposo: 1 hora a temperature ambiente + 4 horas en refrigeración

Rinde: 12 a 15 porciones

Ingredientes:

* 12 oz de gelatina en polvo sabor fresa

* 3 tazas de agua hirviendo

* 60 soletas (ladyfingers), divididas en 3 grupos de 20

* 4 tazas de horchata, divididas

* 24 oz de Mascarpone Real California

* 1 ½ tazas de azúcar glass

* 1 ½ tazas de fresas picadas

* 5 tazas de crema para batir Real California, divididas

* 14 oz de leche condensada azucarada Real California

* ¾ taza de azúcar, dividida

* 1 oz de fresas deshidratadas en polvo

* 10 fresas enteras para decorar (opcional)

Instrucciones:


En un tazón grande, disuelve la gelatina de fresa en el agua hirviendo. Mezcla bien hasta que esté completamente disuelta. Deja reposar a temperatura ambiente por aproximadamente 1 hora, hasta que enfríe.


Vierte 1 ½ tazas de horchata en un vaso alto y delgado. Sumerge rápidamente 20 soletas en la horchata y colócalas en el fondo de un refractario de vidrio de 33×23 cm (13×9 pulgadas).


En un tazón grande, bate el mascarpone Real California, el azúcar glass y 1 taza de horchata a velocidad alta, hasta obtener una mezcla ligera y esponjosa.
Extiende uniformemente sobre las soletas con horchata.


Distribuye las fresas picadas de manera uniforme sobre la capa de mascarpone con horchata.


Vierte 2 tazas de la gelatina ya enfriada en un vaso alto. Sumerge rápidamente otras 20 soletas y colócalas en una capa uniforme sobre las fresas.


Bate 2 tazas de crema para batir Real California a velocidad alta durante 2 minutos, hasta que se formen picos suaves.
Añade la leche condensada azucarada Real California en forma de hilo, sin dejar de batir.
Luego, incorpora lentamente 1 taza de gelatina de fresa a temperatura ambiente y bate un minuto más, hasta que la mezcla esté esponjosa.
Extiende esta crema de fresa sobre las soletas con gelatina.


Vierte las 1 ½ tazas restantes de horchata en un vaso alto. Sumerge las últimas 20 soletas rápidamente y colócalas sobre la capa de crema de fresa.


Bate 3 tazas de crema para batir Real California durante 2 minutos a velocidad alta, hasta formar picos suaves.
Añade ¾ taza de azúcar y continúa batiendo por 1 minuto más.
Reserva 1 taza de esta crema batida para decorar.
Esparce el resto sobre la última capa de soletas.


Espolvorea la parte superior con el polvo de fresa deshidratada.
Coloca la crema batida reservada en una manga pastelera y forma pequeños copetes decorativos sobre la superficie.
Si deseas, coloca una fresa entera sobre cada copete para decorar.


Refrigera por al menos 4 horas antes de cortar y servir.

Encuentra todos los ingredientes lácteos para este Tiramisú de Horchata de Fresa aquí: https://www.realcaliforniamilk.com/es

Ice Cream Cherry Biscuits

Ice Cream Cherry Biscuits

July is Ice Cream Month and my favorite time of the year to host friends for dinner. I usually throw some veggies on the barbie for a simple meal and save the impressing for dessert when I bust out my unique Ice Cream Cherry Biscuits. These Ice Cream Biscuits are made with Real California Ice Cream in the dough! They are perfect for a #SnackHappy occasion especially when you fill the centers with whipped cream, fresh cherries, and a scoop of ice cream! It’s a decadent dessert that will have your guest oohing and ahhing. You can serve them at dinner parties but would also be a great option to serve as a brunch treat.

Excitement fills me whenever I think of these yummy Ice Cream Biscuits and realize they come from a long line of quality ingredients made with sustainably sourced Milk from California dairy families. I simply look for the seal to find my  prized Real California dairy products for perfect biscuits everytime.

Check out @RealCalifMilk recipes here and let me know what snacks you’re creating this summer!

https://www.realcaliforniamilk.com/recipes/?occasion=snack

Ice Cream Cherry Biscuits

Prep: 20 minutes

Cool/rest: 8 hours

Bake: 22 minutes

Yields: 12 ice cream biscuits

Ice Cream Biscuits:

  • 2 ½ cups all purpose flour
  • 1 ½ tablespoons baking powder
  • 2 tablespoons sugar
  • 1/2 teaspoon salt
  • 1 teaspoon baking soda
  • 2 sticks Real California butter, cut into tabs and frozen
  • 1 ¼ cups Real California Vanilla ice cream, melted and divided
  • 2 tablespoons turbinado sugar

Cherry Mixture:

  • 2 cups cherries, pitted and cut in half
  • 1/4 cup sugar
  • 1 teaspoon orange or lemon zest
  • ½ teaspoon almond extract

Whipped Cream:

  • 2 cups Real California whipping cream (cold)
  • 1/4 cup sugar

Ice Cream:

  • Real California Ice Cream of choice

Directions:

Ice Cream Biscuits: Add flour, baking powder, sugar, salt, and baking soda to a food processor. Pulse until dry ingredients combine.

Add in the frozen butter and pulse to break up the butter until it shapes into small pea size pieces.

Slowly add in 1 cup melted ice cream, then pulse until dough comes together.

Transfer dough to a clean surface and knead for a few minutes.

Roll dough on a lightly floured surface into a rectangle.

Fold the dough onto itself several times, then roll out again.

Then fold the dough like a folder with each end meeting in the middle, then fold the outer ends toward each other so you know have 4 layers of dough on top of one another.

Roll one more time just to meld all the layers together.

Cut into 2 inch round ½ inch thick circles until all dough is used.

Place on a parchment paper lined baking sheet and place in the freezer overnight (8 hours minimum) or until frozen.

Preheat oven to 400 degrees Fahrenheit.

Brush the top of the biscuits with ¼ cup melted vanilla ice cream, then sprinkle with turbinado sugar over the tops.

Bake for 22 minutes.

Remove from baking sheet and allow to cool.

Cherry Mixture: Mix all ingredients together in a bowl and allow to rest for 20 minutes or until cherries form a syrup. (This portion can be made a few days in advance for all flavors to meld.

Whipped Cream: Pour Real California whipping cream in a stand up mixer with a whisk attachment. Whisk on high for 2 minutes or until soft peaks form. Sprinkle sugar over the top and continue whisking on high until peaks form and cream is dense.

Assemble: Split biscuit in half. Add a scoop of Real California Ice Cream to one half then pour a tablespoon of cherry mixture over top. Pipe in or spoon in a delicious amount of whipped cream, then top with other half of biscuit. Enjoy!

Julio es el mes del helado y mi época favorita del año para invitar a amigos a cenar. Por lo general, tiro algunas verduras en la barbie para una comida sencilla y guardo la impresionante para el postre cuando saco mis exclusivas galletas de helado de cereza. ¡Estas galletas de helado están hechas con helado Real California en la masa! ¡Son perfectos para una ocasión #SnackHappy, especialmente cuando llenas los centros con crema batida, cerezas frescas y una bola de helado! Es un postre decadente que hará que tu invitado se emocione. Los sirvo en cenas, pero no me opondría a servirlos como un brunch.

Me emociono mucho cada vez que pienso en estos deliciosos bizcochos helados y me doy cuenta de que provienen de una larga línea de ingredientes de calidad elaborados con leche de fuentes sostenibles de familias lecheras de California. Simplemente busco el sello para encontrar mis preciados productos lácteos Real California para obtener galletas perfectas en todo momento.

¡Mira las recetas de @RealCalifMilk aquí y cuéntame qué refrigerios estás creando este verano!

https://www.realcaliforniamilk.com/recipes/?occasion=snack

Ice-Cream-Biscuits-Made-With-Real-California-Dairy

Galletas De Helado De Cereza

Preparación: 20 minutos

Frío/descanso: 8 horas

Hornear: 22 minutos

Rinde: 12 galletas de helado

Galletas Heladas:

2 ½ tazas de harina para todo uso

1 ½ cucharadas de polvo de hornear

2 cucharadas de azúcar

1/2 cucharadita de sal

1 cucharadita de bicarbonato de sodio

2 barras de mantequilla Real California, cortada en pestañas y congelada

1 ¼ tazas de helado de vainilla Real California, derretido y dividido

2 cucharadas de azúcar turbinado

Mezcla de cerezas:

2 tazas de cerezas, sin hueso y cortadas por la mitad

1/4 taza de azúcar

1 cucharadita de ralladura de naranja o limón

½ cucharadita de extracto de almendras

Crema batida:

2 tazas de crema batida Real California (fría)

1/4 taza de azúcar

Helado:

Real California Ice Cream de elección

Direcciones:

Galletas de helado: agregue harina, polvo de hornear, azúcar, sal y bicarbonato de sodio a un procesador de alimentos. Pulse para combinar.

Agregue la mantequilla congelada y pulse para romper la mantequilla hasta que tenga la forma de pequeños trozos del tamaño de un guisante.

Agregue lentamente 1 taza de helado derretido. Pulse hasta que la masa se junte.

Transfiera la masa a una superficie limpia y amase durante unos minutos.

Enrolle la masa sobre una superficie ligeramente enharinada hasta formar un rectángulo.

Dobla la masa sobre sí misma varias veces y vuelve a estirarla.

Luego dobla la masa como una carpeta con cada extremo juntándose en el medio, luego dobla los extremos exteriores uno hacia el otro para que tengas 4 capas de masa una encima de la otra.

Enrolle una vez más solo para unir todas las capas.

Cortar en círculos redondos de 2 pulgadas y ½ pulgada de grosor hasta usar toda la masa.

Coloque en una bandeja para hornear forrada con papel pergamino y coloque en el congelador durante la noche (8 horas como mínimo).

Precaliente el horno a 400 grados Fahrenheit.

Cepille la parte superior de las galletas con ¼ de taza de helado de vainilla derretido y espolvoree azúcar turbinado por encima.

Hornear durante 22 minutos.

Retire de la bandeja para hornear y deje que se enfríe.

Mezcla de cerezas: mezcle todos los ingredientes en un tazón y deje reposar durante 20 minutos. (Esta porción se puede hacer con unos días de anticipación para que se mezclen todos los sabores.

Crema batida: vierta la crema batida Real California en una batidora de pie con un accesorio para batir. Batir a velocidad alta durante 2 minutos o hasta que se formen picos suaves. Espolvorea azúcar por encima y continúa batiendo a velocidad alta hasta que se formen picos y la crema esté densa.

Armar: Partir la galleta por la mitad. Agregue una bola de helado Real California a la mitad y luego vierta una cucharada de mezcla de cerezas encima. Vierta con una cuchara o con una cuchara una cantidad deliciosa de crema batida, cubra con la otra mitad de la galleta. ¡Disfrutar!

Shrimp Fries

Shrimp Fries

I read somewhere that people struggle with making hard decisions when it’s super hot outside. No wonder Summer has me over here sharing my beloved Shrimp Fries with family and friends. I’m just kidding, it actually brings me great joy to make a big batch of Shrimp Fries for casual gatherings. Everyone gathers around the plate or tray and digs in. It is a fantastic conversation starter if you can get a word in edgewise between bites.

Yeah, yeah the fries are crispy and the shrimp is juicy…. but IT’S THE  delicious Real California Oaxaca cheese that tops the fries and the luscious Real California Crema that crisscrosses it’s way across the plate FOR ME. That Real California Hispanic dairy inspires me to have another bite because I know it’s made with sustainably sourced Real California Milk from California dairy families. I call this #SnackHappy plate of Shrimp Fries my DREAMY SUMMER FOOD!

I shared my Shrimp Fries recipe with my friends over at Real California Milk and they have it on their website. Feel free to click on the link below and discover this recipe and other Snack Happy recipes to eat all Summer long!

Check out @RealCalifMilk recipes here and let me know what snacks you’re creating this summer!

Leí en alguna parte que a la gente le cuesta tomar decisiones difíciles cuando hace mucho calor afuera. No es de extrañar que Summer me tenga aquí compartiendo mis queridas papas fritas con camarones con familiares y amigos. Solo bromeo, en realidad me da mucha alegría hacer un gran lote de papas fritas con camarones para reuniones informales. Todos se reúnen alrededor del plato o la bandeja y comen. Es un comienzo de conversación fantástico si puedes decir una palabra entre bocados.

Sí, sí, las papas fritas son crujientes y los camarones son jugosos… pero ES EL delicioso queso Real California Oaxaca que cubre las papas fritas y la exuberante Crema Real California que se entrecruza en el plato PARA MÍ. Ese producto lácteo Real California Hispanic me inspira a probar otro bocado porque sé que está elaborado con leche Real California de fuentes sostenibles de familias lecheras de California. ¡Llamo a este plato #SnackHappy de Camarones Fritos mi COMIDA DE VERANO DE SUEÑO!

Compartí mi receta de papas fritas con camarones con mis amigos en Real California Milk y la tienen en su sitio web. ¡Siéntete libre de hacer clic en el enlace y descubre esta receta y otras recetas de Snack Happy para comer todo el verano!


Presley's Panaderia "Sweets"

Ice Cream Cherry Biscuits

Ice Cream Cherry Biscuits

July is Ice Cream Month and my favorite time of the year to host friends for dinner. I usually throw some veggies on the barbie for a simple meal and save the impressing for dessert when I bust out my unique Ice Cream Cherry Biscuits.…

Christmas Tree Cranberry Pecan Scones

Christmas Tree Cranberry Pecan Scones

What is your early morning treat of choice to leave for Santa? Are you team cookies or team scones? A few years ago my son and I made Christmas Tree Cranberry Pecan Scones during the holiday season. We fell in love with these scones, made…

Chocolate Calavera Cake

Chocolate Calavera Cake

On Dia De Los Muertos I honor my dearly departed with Chocolate Calavera Cake made with my family’s favorite Abuelita Chocolate! I know my tio’s and tia’s are sure to come when I put these cakes on the altar. The lovely scent of marigold and…

Cherry Carlota

Cherry Carlota

Calling all dessert lovers! Could we really celebrate Easter without a gorgeous dessert? I’m taking the fuss out of our Easter meal this year with a simple and easy Carlota! I decided to add cherries to my Carlota and change it’s traditional color of white…

Mini Apple Pies

Mini Apple Pies

I usually repurpose one of my senior pie photos on #PiDay because I make pie all year round. I felt this year deserved a brand new photo and something a little fantasy and hopeful. Mini apple pies seem to be a good portrayal of how…