Recent Posts

Mommy And Son Time This Summer With #DoleSquishems

Mommy And Son Time This Summer With #DoleSquishems

 Disclosure: This is part of a sponsored campaign with Latina Mom Bloggers and Dole Packaged Foods, LLC. However, all opinions expressed are my own.

I seriously run around like a chicken without a head. Every single second of my day is jammed packed with something to do. I long for extra time to spend with my son since he is on summer vacation and his days are being spent here in the house. Sometimes I just have to stop working, put my phone away and have some one on one time with my baby boy (well he’s not really a baby, he’s about to be 4). I’ve been thinking of different ways to pass our time together in the scorching heat. I signed us up for swimming lessons, and have several big outings planned for the warm weather…. everything from road trips to amusements park adventures, but what should we do on the days when I just need a moment to bond with him? Here’s what I came up with and how I came up with it…..

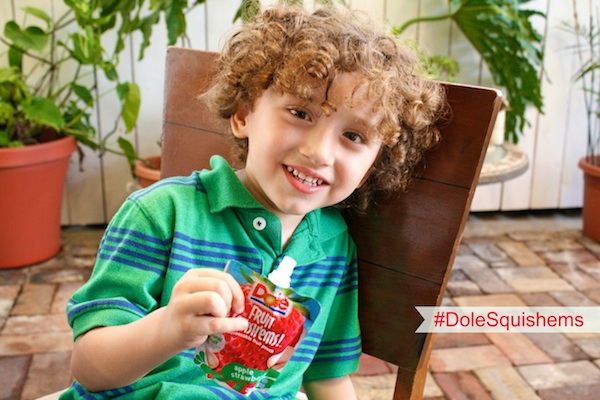
My son loves popsicles and asks for them every other minute throughout the day, especially in the heat, and I don’t necessarily want him to have all that sugar. He was asking for another popsicle the other day and as I opened the freezer door about to grant him his request,  I saw a Dole Fruit Squish’ems frozen on the top shelve of the freezer… the light bulb went off. I realized he and I could eat the delicious all natural Dole Fruit Squish’ems as our summer bonding treat. He’ll be happy that Mom gave in to his frozen treat whim, and I’ll be thrilled knowing I’m giving my son a BPA, GMO, and Gluten Free snack that is kinda like a frozen slushy. He’ll have his pick of all natual Apple, Mixed Berry, or Strawberry-Apple, and I’ll have the pleasure of squishing him in my arms all summer long!

Disclosure: This is part of a sponsored campaign with Latina Mom Bloggers and Dole Packaged Foods, LLC. However, all opinions expressed are my own.


The Mexican Candy Guide!

The Mexican Candy Guide!

Does this picture excite you with the idea of Mexican candied fruits and a little candy on the side?  I placed my candy guide on Babble.  Click here to see the complete list of all my favorite goodies.

Grilled Corn And Queso Fresco Salad #VivaCADairy

Grilled Corn And Queso Fresco Salad #VivaCADairy

This is a sponsored post in collaboration with Latina Bloggers Connect and the California Milk Advisory Board.   All opinions are my own. 

Are you ready to rev up that Bar-B-Q pit and shish kabob for grilling? It’s officially grilling season with Memorial Day around the corner and Father’s day a stones throw away. It’s time to start planning your menus and gathering people around the pit. What do you typically like to grill? My family grills carne asada and anaheim chiles stuffed with queso quesadilla. We love to grill veggies and green onions, if my uncle is around he always wants his share of jalapenos thrown a top the fire-y hot grate. I like to make packets of aluminum foil and fill them with chopped zucchini a little bit of olive oil and cotija cheese…… I call them Bar-B-Q calabasitas. Here’s the serious truth, we can’t have an outdoor cooking session without making Grilled Corn And Queso Fresco Salad. I usually prep the corn in the house then throw it on the barbie, while the maize is grilling I chop up the other ingredients and make a dressing of crema, lime juice, and a little cotija cheese. OMG…. My mouth just watered recounting the details of this recipe back to you. Every time I make the salad (which is when we have a Bar-B-Q) my fiance tells me I need to be making this salad at least once a week. My Mom loves it cuz it’s vegetarian, and I heart it because it’s down right GOOD! I usually make it as a side dish but it could be enjoyed as a meal all on it’s own. Don’t get me wrong, it does taste lickable paired with a slice of chicken or sizzling piece of carne asada as well. But what really makes this salad pop is the queso fresco teamed up with the sweet corn and the tangy crema lime cojita cheese dressing. Delish! Make it for your next Bar-B-Q! Plus it’s so easy to get all the hispanic dairy needed for this recipe. With California being the leading producer of hispanic dairy products all you have to do is look for the Real CA Milk / cheese seals on the labels of your hispanic dairy. These cheeses will give your next meal the authentic touch of latin cuisine and make it taste better then you could have imagined. Enjoy!

Ingredients for Grilled Corn and Queso Fresco Salad:

  • 1 – tablespoon of butter (room temperature)
  • 4 – corn on the cob
  • 5 or 6 – stalks of green onion
  • 1 – tablespoon of olive oil
  • salt to taste
  • 2 – ripe avocados (sliced and cubed)
  • 1 – cup chopped tomatoes
  • 1 – cup sliced red onion
  • 1/2 – cup cilantro leaves
  • 5 – radishes (thinly sliced)
  • 1 – package queso fresco Ranchero (crumbled in large pieces)
  • (optional) 2 – grilled green chiles- diced (serrano, or jalapeno, or anaheim)

Ingredients for Crema Lime Cotija Cheese dressing:

  • 3 – tablespoons crema
  • 1 1/2 – large limes (juiced, about 4 tablespoons)
  • 1 – tablespoon cotija cheese
Directions:
  1. Heat up the bar-b-q or grill.
  2. Smear butter on the corn on the cob. Set to the side.
  3. Trim edges of green onions off and smear with olive oil. Set to the side.
  4. Sprinkle both corn and green onions with salt to your liking.
  5. Place both corn and green onion on bar-b-q and grill for green onion for about 6 minutes. 
  6. Grill the corn for 15 to 20 minutes or until kernels are slightly charred. 
  7. Remove from grill and shave the kernels from the cob with a sharp knife. 
  8. Add shaved corn to a bowl along with avocado, tomato, red onion, cilantro, radishes, queso fresco, (optional) green chiles, and grilled onion to serve on the side. (pictured above)
  9. Give the ingredients a good mix, and set to the side.
  10. In a small bowl mix ingredients for dressing with a whisk, then pour over salad and give a final mix.
  11. Serve with grilled green onion on the side.
  12. Enjoy!
Honey Peanut Butter Banana Chocolate Crepe Cake

Honey Peanut Butter Banana Chocolate Crepe Cake

Layered cake is considered something special in my book. I have had the divine pleasure of the black and white indonisian cake. I have had layered berry cakes and the list goes on. I know people make crepe cakes by staking crepes on top of each other with gooey fillings in between. But never have I had a crepe cake with layers of crepes baked into the cake. I decided to make one for myself since chocolate crepe cake was exactly what I was craving. I don’t want you think I’m mad as a hatter, but this was one of the best cakes I ever tasted. Make it for yourself…. it’s a special treat. The peanut butter honey frosting and fresh banana slices will seriously make you a firm believer in this cake. Promise.

Ingredients for honey peanut butter chocolate crepe cake:

  • 1 – box Devil’s food chocolate cake mix (use measurements for water, oil, and eggs according to box, and mix into batter)
  • 12 – ready made Melissa’s produce crepes
  • 2 – cups skippy creamy peanut butter
  • 1 1/2 – cup honey
  • 2 – bananas (sliced into 1/4 inch slices)

Directions:

  • Preheat the oven to 350 degrees fahrenheit.
  • Spray two 8-inch round cake pans with a non stick baking spray. Then line the bottom of the pans with wax paper.
  • Pour 1/4 cup of cake batter into the bottom of each pan. Then with a spatula spread it evenly across the bottom of the pan. Wax paper lined pan with 1/4 cup of chocolate cake batter being poured inspreading cake batter with a spatula on wax paper
  • Top the thin layer of cake batter with a crepe, then pour another 1/4 batter on top of crepe, spread it out evenly. place crepe on top of thin layer of chocolate cake batter.Pour cake batter on top of crepe to create the crepe layers inside of cake.
  • Continue this layering process of cake batter and crepe until each pan has 6 crepes in each, then evenly distribute the remaining batter between both pans.
  • Bake the cakes for 25 minutes or until a toothpick inserted in the middle comes out clean.
  • Allow the cakes to cool completely.
  • Remove the first cake from the pan and remove the wax paper from the bottom, place on a plate.
  • In a bowl whisk the peanut butter and honey together until completely combined. Divide it into two portions.
  • Spread the first portion of peanut butter frosting on the top of the first cake.Spread peanut butter frosting on top of first layer of cake
  • Place sliced bananas on top of the peanut butter frosting. Banana slices fill the middle of the cake.
  • Remove the second cake from the pan and remove the wax paper off the bottom of the cake. Place the second cake on top of the first peanut butter frosted cake.
  • With the remaining peanut butter frosting spread it on the top of your second cake.
  • Enjoy.
Brunch with Mom: Jalapeno Corn Bacon Cheddar Scones!

Brunch with Mom: Jalapeno Corn Bacon Cheddar Scones!

Mother’s Day is one of the most treasured times of the year. We love our Mothers each day of the year, but really show it with a bang every May. A few of the best Latina food bloggers I know and myself got together to create a special e-book for a Mother’s Day Brunch. I submitted a savory scone recipe. Pictured below…. Click on the photos to get to the e-book and find more recipes perfect for an afternoon brunch. Feliz Dia de Las Madres! Happy Mother’s Day! Enjoy!


Hamburger Tacos And A Chance To Win A McCormick Spice Kit

Hamburger Tacos And A Chance To Win A McCormick Spice Kit

Disclosure: This post is sponsored by McCormick, who sent me a wonderful spice kit to aid my taco night! The recipe and opinions are 100% my own.

I’ve been raised eating hard shell tacos. Crispy on the outside and perfectly tender and succulent on the inside. Greasy fingers and lots of napkins. My grandfather always drains his on a paper bag. I guess I’ve graduated into modern times and drain mine on a paper towel lined plate. Either way, the tacos are always delicious and they’re part of my family food soundtrack. I start to get a little antsy when they are freshly taken out of the frying oil and are scorching hot, and I’m trying to let them cool enough to get the toothpicks taken out. I just want to stuff my taco with all the fixings and crunch. It’s the anticipation that drives me insane. I can almost get in a bad mood for that instant until the taco hits my lips and all problems are solved. Temporarily at least.

Well tonight was like any other taco night I’ve shared with my family, except I had to have dinner on the table pronto…. we were all starving after a crazy day. I knew my fiance was craving meat, and I had some left over potatoes in the fridge. So I made the type of tacos I always make when I’m extremely pressed for time. We call them hamburger tacos. Here’s the thing… you put the meat in the tortilla raw and as it fries the meat cooks. You just have to make sure to spice it up right. I think the real secret lies in the McCormick chipotle chile pepper, not too much just the right amount. It seasons your taco and takes your ground beef from being a bland everyday ground to something special and you really didn’t do that much. Well you did, but you really didn’t…. McCormick did.

Ingredients for Hamburger Tacos:

Optional Sides:
  • Mashed Potatoes
  • Cheddar Cheese
  • Sour Cream
  • Lettuce 
  • tomato
  • salsa or hot sauce
  • avocado
Directions:
  1. In a large bowl combine ground beef. garlic powder, chipotle powder, cumin, salt, and pepper. Mix to combine. Set to the side. 
  2. Warm corn tortillas on an open flame. Heat on each side for 30 seconds then place tortillas in a cloth or tortilla warmer. Set to the side.
  3. Take a tortilla, and place a heaping tablespoon of raw meat on one side. Then fold the tortilla to encase the meat.
  4. Enclose the taco with toothpicks on either side. Repeat until all tacos are filled with meat.
  5.  In a large frying pan over a medium flame add vegetable oil and allow to get hot.
  6. Add tacos to hot oil. 
  7. Fry tacos on each side for 5 minutes for a total of 10 minutes.
  8. Remove from oil and place on a paper towel lined plate to drain and cool for about 5 minutes. It should look like this. 
  9. Remove toothpick closures and fill with a tablespoon of mashed potatoes.
  10. Then add in cheese, lettuce, sour cream and hot sauce. 
  11. Enjoy!

Now for the give away….. First follow McCormick on Pinterest. Then follow the rules below: Pinterest Taco Night Challenge ends May 31st, 2013! Good Luck!


Lemon Coconut Bars

Lemon Coconut Bars

Bright yellow custard.  Sweet tangy lemon.  Meaty coconut.  Wrapped in English short bread cookie crust.  Chewy and magnetically addictive.  If they only existed on  another planet, I’d have to book my flight.  They could transport me to a coffee shop across the Atlantic with brick stone roads and cold air.  Or I could easily be on a beach with the ocean crashing at my feet… that’s how these bars make me feel.  Close my eyes and entwined in their delicious magic I feel adventurous.

Ingredients for Lemon Coconut Bars:

Crust

  • 1 1/2  – sticks of butter (12 tablespoons) (room temperature)
  • 1/2 – cup powdered sugar
  • 1 1/4 – cup flour
  • 1/4 – teaspoon salt

Filling

Directions:
  1. Spray a 8×8 or baker’s edge pan with non stick cooking spray, or grease then sugar dust. Set to the side
  2. Preheat oven to 350 degrees fahrenheit.
  3. In a mixer cream together butter and powdered sugar for about 3 minutes. 
  4. Then add in flour and salt and mix until dough comes together. 
  5. Press dough into the bottom of baking pan.
  6. Bake for 17 minutes, or until dough turns slightly browned at the edge.
  7. Remove from oven and set to the side. Leave the oven on.
  8. Now to make the filling.
  9. In a mixer add in sugar and eggs and mix until completely combined and mixture turns a light yellowish color. About 5 to 6 minutes on a medium high speed.
  10. Then pour in lemon juice, and mix to combine.
  11. Sprinkle flour over mixture and mix for another minute. Then fold in coconut.
  12. Pour lemon/coconut mixture over shortbread crust. 
  13. Place in the oven and bake for 25 to 30 minutes. 25 minutes for them to set, or if you like them a little more golden 30 minutes.
  14. Remove from oven and allow to cool for 3 hours.
  15. Once cooled, run a knife along the edge
  16. Then with the remaining powdered sugar…sift it over the top.
  17. Cut and Enjoy!!!!!