Category: Recipes

Ghostly Boo Stick Appetizers

Ghostly Boo Stick Appetizers

Just in time for Halloween.  Check out my scary appetizers for your Halloween party.    Click here and go over to Babble to see the step by step instruction for these Ghostly Boo Sticks….

Witch’s Cauldron Baked Rigatoni

Witch’s Cauldron Baked Rigatoni

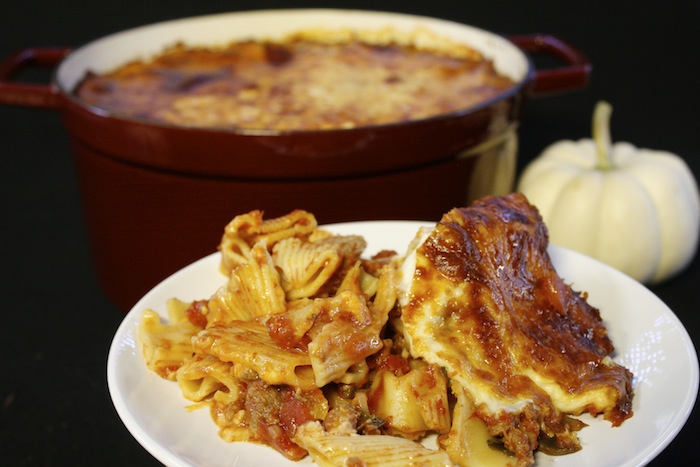
Need a good, hearty meal for Halloween?  Check out this bubbly baked rigatoni dish that’ll be great for any family dinner.  Click here for the step by step pics on how to make it on Babble…..

Papas Gratinadas: Mexican Potatoes Au Gratin

Papas Gratinadas: Mexican Potatoes Au Gratin

Disclosure: This post is sponsored by The Idaho Potato Commission. However; All opinions and recipe are 100% my own. Thank you to my Latina blogueras for their suggestions.

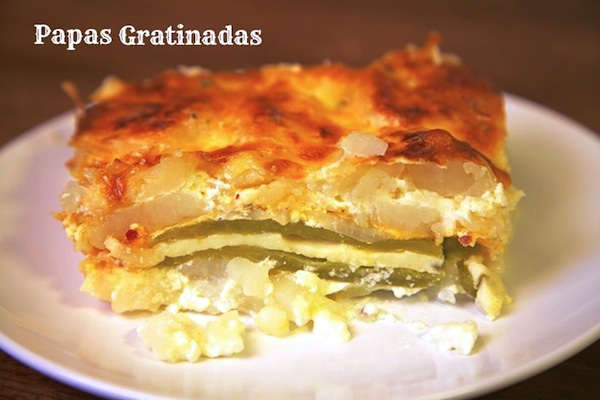
A few weeks ago, I was in New York as one of the top 100 blogueras of Latism. I was chosen along with 99 other Latina bloggers as one of the best Latina bloggers in the nation. We (all 100 0f us) were invited to the United Nations as part of our conference. We were there covering issues about education, health, business, and gender equality with top officials of the secretariat. While I was there I thought about potatoes and how they are so affordable and feed so many people. I remembered my trip to Idaho a year ago and decided to ask a few of my fellow Latina blogueras (Maura of The Other Side Of The Tortilla, Yoly of Savvy Mujer and Cuponeando, and Melissa of Hungry Food Love)  what they make with potatoes? I took what they said , then came home and made one of the suggested dishes. Check out the video below. Super fun, easy, and delicious…. three of my favorite things.

Ingredients for Papas Gratinadas:

  • 7 – Idaho Potatoes (peeled and boiled for 20 minutes)
  • 7 – anaheim chiles (roasted, peeled, and deseeded) (timesaver tip: buy them canned)
  • 7 – 1/2 inch slices of pepper jack cheese
  • 1 3/4 – cups of Mexican crema
  • 1 – onion (sliced)
  • 1 1/2 – cups sharp cheddar cheese (grated)
  • 1/2 – teaspoon chili flakes
  • 1 – teaspoon Lawry’s seasoning salt
  • 1/2 – teaspoon ground black pepper
  • 1 1/2 – cups pepper jack cheese (grated)
  • 10 x 8 casserole dish (spray sides with non stick spray)

Directions:

  1. Peel and boil potatoes for 20 minutes. Drain and set to the side.
  2. Cut potatoes into 1/2 inch slices. It’s okay of it becomes crumbly, you will use the crumbs too. Set to the side.
  3. Slice chiles down the middle and stuff with pepper jack cheese slices. Set to the side.
  4. Preheat oven to 350 degrees fahrenheit.
  5. Pour 1/4 cup of crema on the bottom of the casserole dish. Smooth it out with a spatula or the back of a spoon.
  6. Next place down a layer of potato slices.
  7. Top with stuffed anaheim chiles.
  8. Sprinkle the top of stuffed chiles with sliced onions.
  9. Pour in a 1/2 cup of Mexican crema over the top of onions.
  10. Generously sprinkle the top of the crema and onions with cheddar cheese.
  11. Next srinkle in chili flakes, Lawry’s, and ground pepper.
  12. Add another layer of Idaho potatoes.
  13. Then add in another 1/2 cup of crema.
  14. Top with remaining potatoes and another 1/2 cup of crema.
  15. Finish the whole casserole layering with a 1 1/2 cups grated pepper jack cheese.
  16.  Bake in the oven for 50 minutes, then place the casserole dish on the top shelf of oven under the broiler (on high) for 3 to 5 minutes, or until golden crisp.
  17. Let cool for 20 minutes before serving.
  18. Enjoy!


Potato Peanut Butter Calavera Candy #EnergyToBurn

Potato Peanut Butter Calavera Candy #EnergyToBurn

Disclosure: This is a sponsored post between Latina Bloggers Connect and The National Peanut Board. However the recipe and all opinions are 100% my own.

I feel like I have been hanging by a thread lately. I’m not complaining… I’m just working hard everyday to meet deadlines and get to all my work in a timely manner. As my workload expands and the needs of my 4 year old son grow,  I find more than ever I need help getting through my day and deep into my night. A fast snack I like to eat: Peanut butter and apple. The peanut butter has 7 grams of energy boosting protein per serving, which helps me get through y day. Or I”l reach for a handful of peanuts to pop in my mouth as I run around. Peanuts or peanut butter really provide a lasting energy, and are so super affordable. I always keep a pouch of peanut butter in my purse or a little packet of peanuts, because I never know when I’m gonna need it especially with the holidays upon us.

Going off the subject a little…. My son has taken a serious interest in my pantry. I can’t tell you how many times a day he pulls out ingredients and makes suggestions of what we can make. He’ll pull out salt, flour, peanut butter, and sugar and ask if we could make a cake or cookies or strawberry pancakes. I love that he is becoming familiar with everything that goes into kitchen recipe making. Most of the time I have to turn down his request because I’m busy with something else. The other day I wanted to indulge his new found interest of the kitchen, and I suggested we make some calavera candy to celebrate Dia De Los Muertos. His cute little eyes lit up and he smiled and said “Do we use peanut butter in it?” I told him sure… we will use peanut butter in it!

Ingredients for Potato Peanut Butter Calavera Candy:

  • 1/2 – cup mashed potato (about 1 potato)
  • 2 1/2 – tablespoons half and half
  • 1 – teaspoon vanilla
  • a pinch of salt
  • 10 – cups powdered sugar
  • 1 – cup peanut butter (smooth)
  • chopped peanut pieces

Directions:

  1. Peel and chop a potato. Then boil the potato for 15 minutes or until fork tender. Drain potato and mash. Do not add anything to the potato. Let cool completely. 
  2. In a mixer add mashed potatoes, half and half, vanilla, salt and powdered sugar. Mix until everything is combined and it becomes a dough like texture. Not sticky to the touch. 
  3. Powder a clean work surface and a rolling pin with powdered sugar. Working in quarters roll out your first batch of dough. I sprinkled the top of the dough with powdered sugar as well. 
  4. Roll the potato candy out to 1/4 inch thickness. Then with a skull cookie cutter, cut out as many skulls as possible. Re-roll scraps and cut out more skulls. 
  5. With a small pairing knife cut out the eyes and nose of the calavera / skull on half of the cutouts.
  6. The other half should be placed on a wax paper lined baking sheet and generously spread with peanut butter. 
  7. Then take all the calaveras / skulls with the cut out eyes and place them on top of the peanut butter layer. Press in little pieces of peanuts into the mouth area to form the skeleton teeth.
  8. Refrigerate for 1 hour.
  9. Enjoy! 

Warm Mexican Corn, Black Bean, and Cotija Salad: Esquites Recipe

Warm Mexican Corn, Black Bean, and Cotija Salad: Esquites Recipe

Disclosure: This is not a sponsored post. However; OXO did provide me with a few cooking tools to aid me with this recipe. The opinions and recipe are 100% my own.  I seriously love OXO.

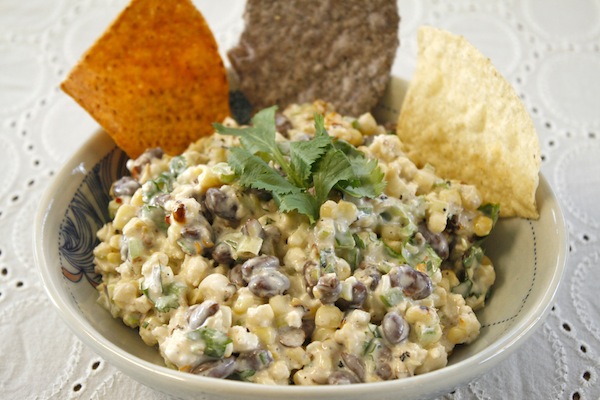
Holy Moly. This salad puts the WOW in factor, as my fiance found out this afternoon. I watched him dip his tortilla chip into his bowl without stopping for a breather over the course of 20 minutes. When he finally took his eyes off his bowl he said to me “SWOON.” I second that emotion. Easy to make and ready to be served after 30 minutes.

Ingredients for esquites recipe:

  • 2 – tablespoons mayo
  • 1 – teaspoon chopped garlic
  • 4 – corn on the cob
  • 1/2 – cup crema (Mexican cream)
  • 2 – limes (juiced)
  • 1/4 – cup cilantro leaves
  • 1 – jalapeno (finely chopped)
  • 1/4 – green onion chopped
  • 5 – ounces cotija cheese (crumbled)
  • 1/2 – teaspoon chili flakes
  • 1/2 – cup black beans (small can, rinsed and drained)
  • Tortilla chips (I prefer nacho cheese Doritos)

Tools Needed:

  • OXO 9″ whisk
  • OXO Thongs
  • OXO Salad Dressing Shaker
  • OXO Corn Peeler
  • OXO 4″ Santoku Chopping Knife

Directions:

  1. In a small bowl whisk mayo and garlic together. Brush mayo on corn, and place on a hot grill. Grill for 15 minutes. Turning the corn with thongs every five minutes.    
  2. While corn is grilling, add any remaining mayo/garlic to the salad dressing shaker also add in crema, and lime juice. Set to the side while you chop cilantro, green onion, and jalapeno. Add chopped greens to salad dressing shaker. Shake well and set to the side till ready to use. 
  3. Remove corn from the grill, and with the corn peeler shave the kernels off the corn and allow to fall into the bowl.  
  4. Add cotija cheese, chili flakes, and black beans to the corn. Mix well to combine. Then pour salad dressing over the mixture. 
  5. Serve salad warm with a nice helping of tortilla chips. 
Spicy Mango Lime Leather #Mangover + A Mango Giveaway

Spicy Mango Lime Leather #Mangover + A Mango Giveaway

Disclosure: This is a sponsored post between National Mango Board and Motherhood. However the opinions and recipe are 100% mine.

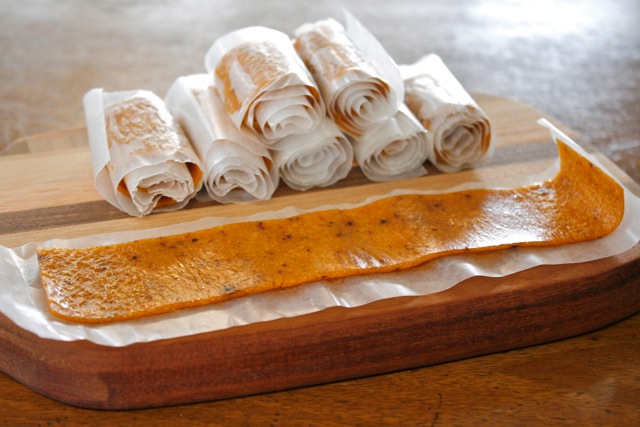
Hands down Mango is my most desired fruit. I could eat it all day if you let me. I didn’t grow up eating the tropical fruit, in fact I rarely remember eating fruit growing up at all, let alone something slightly exotic like Mango. Instead I grew up eating candy from Mexico that was shaped like a fruit and always a bit spicy. Not enough spice  to turn you away, but just enough to quench your craving and leave you wanting more. My favorite was the mango candy. Many moons later I had fresh mango sliced with a tinge of fresh lime juice splashed on top and a pinch of chile powder. A man was standing on the street selling chopped fruit and I picked mango since I knew for sure I loved the candy. It was absolute heaven, I think the fruit actually shut me up, I didn’t speak or say a word. I was too lost in the moment of savoring this delicious treat that I had to keep silent in order to taste it all with every ounce of my being. The rest is history and since then I am a serious mango consumer. I can not walk into a super market and pass the mango bin without packing a bag to take home.

The other day I was packing a lunch for my son and thought I would pack him a fruit leather. As I packed him his lunch I thought back to the candy I loved as a child with the mango, lime and chile…. I thought my son would enjoy it. The next day I made him this lovely mango leather and he ate it and asked for more.

Ingredients for spicy mango lime leather:

  • 2- ripe mangos
  • 1 – large ripe lime (juiced)
  • 1 – tablespoon tajin
Directions:
  1. Preheat oven to 175 degrees fahrenheit.
  2. Peel mango with a potato peeler, then cut flesh on each side of the bone. 
  3.  Dice mango into cubes.
  4. Place all mango cubes in a food processor 
  5. Squeeze lime over mango, then add the tajin.  
  6. Pulse until completely smooth.
  7. Pour mango puree onto a rimmed baking sheet lined with a baking mat or wax paper. 
  8. Bake for 8 hours at 180 degrees fahrenheit.
  9. Remove from oven and allow to cool.
  10. Slowly and gently pull the leather away from the baking mat.
  11. Cut the edges of the leather off to make a perfect square.
  12. Cut  leather into long strips. 
  13. Place the leather strip onto a piece of wax paper and cut the wax paper to fit size of strip. 
  14. Roll the strip up into a compact roll. 
  15. Store in an air tight container for up to a week.
  16. Enjoy!

How to store mangos:

  • Keep unripe mangos at room temperature.
  • Mangos shouldn’t be refrigerated before they are ripe.
  • To speed up ripening, place mangos in a paper bag at room temperature.
  • Once ripe, mangos should be moved to the refrigerator, which will slow down the ripening process. Whole, ripe mangos may be stored for up to five days in the refrigerator.
  • Mangos may be peeled, cubed and placed in an airtight container in the freezer for up to six months.

Would you like to enter for a  chance toWIN a mango kit? Please tell me in a comment below what you make with MANGOS? This giveaway is now officially CLOSED!

Congrats to TEACHMAMA!

Open to U.S. Residents only. No PO Boxes, please. Must be 18 years or older to enter. Contest ends October 11th, 2013 at 9:00 PM, PST and one (1) winner will be randomly chosen from all entries through random.org, and contacted by email. The winner will have 24 hours to respond with a mailing address, or the next winner up will be chosen.


Eat This Halloween

Eat This Halloween

I am gearing up for Halloween, of course I am, it’s my favorite time of the year. I put together an edible gallery of things I’ve made in the past, and I used a few of my friends recipes too…. As you know…. inspiration! Check out my gallery on Babble.