Category: Recipes

Easy Mexican Rice Recipe Made With Hunt’s

Easy Mexican Rice Recipe Made With Hunt’s

Disclosure: This post is sponsored by Latina Bloggers Connect on behalf of Hunt’s Tomato Sauce.  The opinions are 100% my own, and the recipe is one passed on to me by my Grandfather. 

Mexican rice made with Hunt'sI can still hear my grandfather telling me in his authoritative voice “You gotta fry the rice till it looks burned, keep mixing it.” I remember at the time I used to think “burned: has this old guy lost his marbles? Who wants their rice burned.” I think back to those days when I was just learning to cook and rice seemed like such a daunting hurdle to jump. The intimidation of making a flakey rice that didn’t turn to mush seemed impossible. I used to watch my grandfather hoping for a master lesson of Mexican Rice cooking. He would fry the rice and onion until it was golden brown or as he described it burned, that was always my signal that the Hunt’s tomato sauce was sure to follow. He would allow me to pour the tomato sauce into the pan and over the rice. I loved the sound of the sizzle the tomato sauce made when it hit the hot rice, and how it bubbled along the edges. The heavenly scent of Mexican rice filled the air and I knew I was halfway there.   The most challenging part was how to boil the rice once the broth went in. My Grandfather would say “Let the broth boil, then cover the pan with the lid and lower the flame to a simmer for 20 minutes, and you’ll have perfect rice, worthy of being in the movies.”

Many authentic Mexican dishes call for the use of tomatoes, and Latinos are known for using fresh, natural, quality ingredients when they cook for their families. My Grandfather was no different and passed down his tradition of quality ingredients to make sure we were eating right. This is the way my grandfather made his rice, and it’s the way I continue to make it today…. always using Hunt’s 100% natural tomato sauce. 

Ingredients for Mexican rice

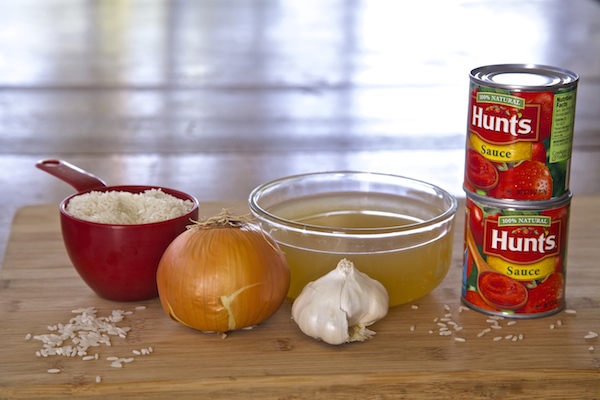
Ingredients for Mexican rice:

  • 1 – tablespoon vegetable oil
  • 2 – cups long grain rice
  • 1 – onion (chopped)
  • 2 – cloves garlic (minced)
  • 8- oz. Hunt’s tomato sauce
  • 3 – cups chicken or vegetable broth
  • a pinch of oregano
  • 1/2 – teaspoon salt
  • 1/2 – teaspoon black pepper

Direction:

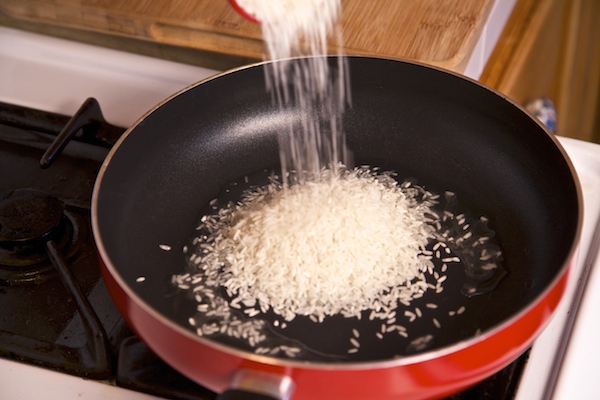
  1. In a frying pan (fit with a lid) over a medium high flame, add in vegetable oil and allow to get hot.
  2. Once oil is hot add in rice, and mix to make sure all rice is coated in oil. Cook for 5 to 7 minutes or until lightly brown. rice being fried for Mexican rice
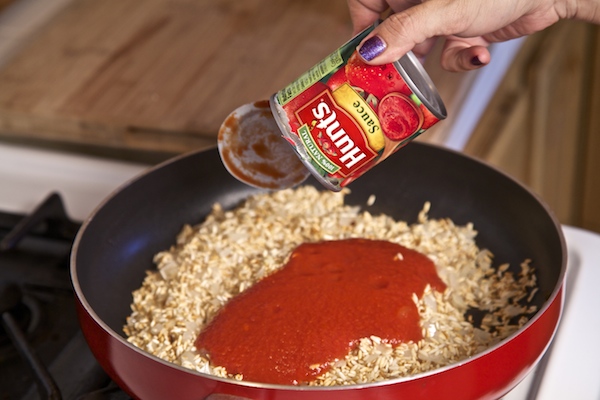
  3. Once rice is browned add in onion and garlic. Mix to combine. Cook for an additional 5 to 7 minutes or until rice is browned and is starting to look slightly burned. Adding chopped onion and minced garlic to rice
  4. Pour in the Hunt’s tomato sauce, and mix to combine. Making Mexican Rice with hunt's tomato sauce
  5. Pour in the broth. broth
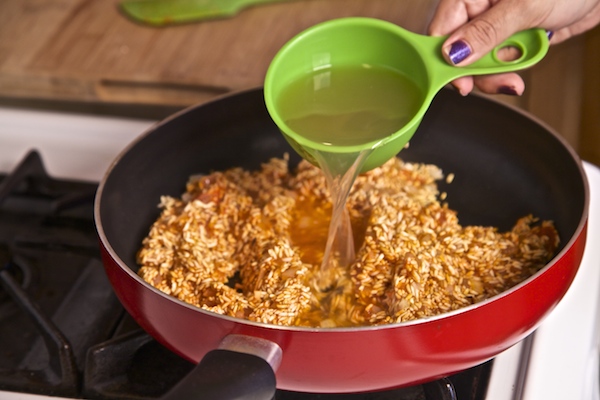
  6. Allow the broth to come to a boil. Mexican-rice-boiling-in-broth
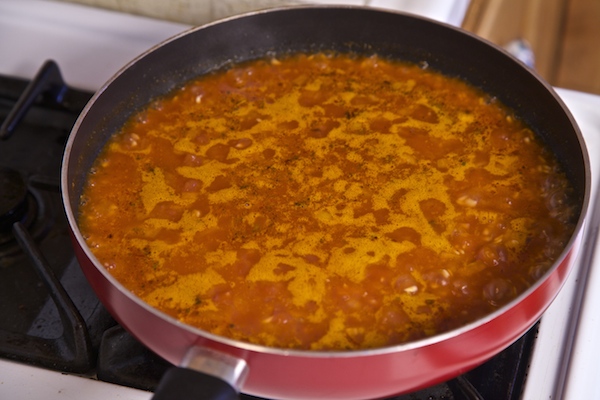
  7. Once the broth is boiling. Cover with the lid, and lower the flame to a simmer. Cook for 20 minutes.
  8. Enjoy!

Hunts Natural Logo

Disclosure: This post is sponsored by Latina Bloggers Connect on behalf of Hunt’s Tomato Sauce.  The opinions are 100% my own, and the recipe is one passed on to me by my Grandfather. 
Dia De Los Muertos Gelatina Cake

Dia De Los Muertos Gelatina Cake

Dia de los muertos gelatin cake with marshmallow flowers

What’s with Mexicans and skulls? Usually skulls are associated with a negative connatation, but for Mexicans during Dia De Los Muertos, the skull takes on a completely different and beautiful meaning. The skull represents death and rebirth, the death of somebody leaving the world as we know it, and a rebirth of your beloved one who has passed and their soul moving on to a world of spirits and the afterlife. The skull personifies the humans we once knew, and during the Day of The Dead we take the time to honor the family and friends we have lost with offerings to their spirits in the shape of the skull, the same way our ancestors had done centuries before us. Of course there are the traditional foods associated with Dia De Los Muertos like Pan De Muerto, Tamales, Sugar Skulls, and Mole. I observe those foods as much as the next person , but I also enjoy making a skull dessert and decorating it ever year along with building my in-home alter.

I needed some flowers for my home altar I’m building, where I will eventually present my foods. Once I grabbed the yellow silk marigolds I ran across a skeleton mold on my way to the check out, and quickly imagined what it would look like on top of a cake. I thought of my friend Rocio who I lost twenty years ago and how she loved chocolate cake. This year in addition to my family, I will make a special place for Rocio’s chocolate cake and decorate it in marshmallow flowers .

Ingredients for Dia De Los Muertos Gelatina Cake:

  • 2 – packets Knox gelatin
  • 1 – can La Lechera (sweetened condensed milk)
  • skeleton gelatin mold
  • Chocolate cake mix
  • eggs
  • water
  • oil
  • chocolate frosting
  • small marshmallows
  • colored sugar
  • small round colored candies
  • black icing.

Directions:

  1. In a bowl mix together 2 cups of boiling hot water and Knox gelatin. Mix until completely dissolved. Add in entire can of La Lechera and mix to combine. Should make 3 cups. Pour into skull mold and refrigerate for 4 to 5 hours or overnight. pour gelatin mixture into mold
  2. Bake cake according to box and allow it to cool completely.
  3. Assemble and frost cake with frosting.
  4. Cut marshmallows with sharp kitchen scissors diagonally.
  5. Then dip sticky side of cut marshmallow into a dish of colored sugar to color marshmallow petals. Set to the side until ready to use. cut marshmallows diagonally and dip in colored sugar to make marshmallow flowers
  6. Unmold gelatin skull from mold. Place it in the center of frosted cake. unmold gelatin for the center of the cake
  7. Decorate the sides of the cake with colored marshmallow petals, and place a small round candy in the center of the flowers. place colored marshmallow petals in a flower shape
  8. Take the black icing fitted with a piping attachment and fill the eye cavity of skull gelatin with icing. Fill eye cavity of skull with black icing
  9. Also draw a straight line across the skull mouth, then stitch over from top to bottom with black icing. Let the icing mouth sit on the gelatin skull for about 10 minutes, then remove the icing to reveal a stain.
  10. Fill the nose cavity with colored sugar.
  11. Decorate the forehead of the skull with  marshmallow flower petals.
  12. Enjoy!

PIN PICTURE BELOW FOR LATER:

An easy to make Dia De Los Muertos Gelatin Cake.  Decorated with colored marshmallow flower petals, and black icing. Day of the dead chocolate cake. Calavera made with skull mold.

Halloween Graveyard Bean Dip

Halloween Graveyard Bean Dip

A Halloween graveyard bean dip. This dip makes for a great centerpiece until your ghostly guests are ready to eat.

Are you having a Halloween party? If you are… this is a great way to kick the festivities into high gear. You see, no Halloween party would be a complete without a graveyard bean dip to dig your bones into. Party ghouls will “ooze and aah” as they see this edible cemetery is up for grabs. The ghostly haunts is filled with 8 different layers of dipping fun, and serves as a great centerpiece until people are ready to devour.  Or in my case last year, it was ZOMBIES. I went to a Zombie themed party and everybody went all out, of course they did, it was an entertainment industry party and the costumes were amazing and scary as heck. It was the funniest sight to see a dozen or so remarkably made up zombified friends of mine all corralled around this graveyard dip I made. It was as if they were real zombies and the brain appetizers had just come out from the kitchen. They all went insane for this dip, I’m not kidding when I say it’s very addicting and flavorful. I’m still kicking myself for not having a camera that night.

This year, because of how well received my graveyard bean dip was, I decided that I’m making this an annual reoccurrence. Me being who I am though, I want to make it slightly different or even try and top myself from the year before. How would I do that? A few days ago I was at my local Walmart in Rosemead walking through the massive chip aisle, as I always do because the boys in my family are chip freaks, and I happened upon a spooky treat…. Cheetos Bag Of Bones. Basically they are cheetos shaped like skeleton bones. At that moment a black lightbulb popped up over my head, and I thought “OMG, these cute little cheetos bones will add so much character to my graveyard dip.” Please check out the recipe below and the little Cheetos bones did exactly what I thought. While I was at the store I also picked up bags of candy and a cool light up pumpkin for a party table. Check out the pic at the very bottom.

Simple ingredients used to make Halloween graveyard bean dipIngredients for Halloween Graveyard Bean Dip:

  • Tostitos scoops
  •  tomatoes (chopped)
  • sour cream
  • grated cheese
  • sliced black olives
  • chopped jalapenos
  • refried beans
  • guacamole


Decorations:

  • wheat tortilla
  • Pillsbury crescent rolls
  • Cheetos ‘Bag Of Bones’

Directions:

  1. Start with a clear pyrex baking dish.
  2. Crush a thin layer of tostitos scoops at the bottom. Reserve the rest of the bag to eat the bean dip with later. Tostitos scoops serve as the first layer for bean dip
  3. Top crushed chips with chopped tomatoes.
  4. Spoon enough sour cream to cover the entire layer of tomatoes. sour cream over tomatoes
  5. Layer grated cheese on top of sour cream.
  6. Top with black olives.
  7. Sprinkle a thin layer of chopped chiles over olives.
  8. Spread refried beans over chiles. refried beans spread over chiles
  9. Make a perfect rectangle in the center of the beans and fill with guacamole.
  10. Frame the guacamole with black olive slices.
  11. Decoration for the graveyard: I started with wheat tortillas. Using an x-acto knife I cut out a tree shape, and head stones. A wheat tortilla cut into the shape of a tree with x-acto knifeThen fry on each side until crisp. wheat tortilla fried till hard for Halloween graveyard bean dip
  12. To make the floating ghosts: I unfolded the pillsbury crescent dough and carved out ghost shapes with an x-acto knife.

    Loading

    Making #Halloween come to life with these food friendly #ghosts. Graveyard recipe up on my blog later today! #WMTMoms @walmart

    View on Instagram

     Then baked the dough ghosts until golden crisp (according to package for time and temperature), once they came out of the oven I shoved a stick into the ghost and allowed them to cool completely with the stick in.

  13. Assemble the tree slightly off center of rectangle. Then place the ghosts where you feel they will be the most visible. Stick the different sized head stones into the guacamole, then place a cheetos skeleton bone skull at the base of the head stone. A close up look at Halloween graveyard. I used Cheetos 'Bag Of Bones' skulls for the headstones. a closer view of Halloween graveyard bean dip  The big ghost for Halloween graveyard bean dip Over head view of Halloween graveyard bean dip
  14. Serve warm or cold.
  15. Happy Halloween! Enjoy!

Pin this pic for easy instruction: Easy steps to make this Halloween graveyard bean dip. I used tortilla to create the trees and headstones, and pillsbury crescent dough to make the ghosts. Can be enjoyed warm or cold.


Candy For Pumpkin:

  • Snickers (fun size)
  • Twizzlers (caramel apple )

pumpkin candy

Walmart-Moms-Disclaimer.2013


Calavera Queso Fresco Salsa Dip

Calavera Queso Fresco Salsa Dip

A recipe I made for Dia De Los Muertos:  made with Cacique's Queso Fresco and salsa

I’m thinking of my feisty friend Alfonso (my fiancés father) as Dia De Los Muertos approaches.  It’s been almost 5 years since he stepped out of his human life and floated into the other side. I was there as he passed and watched his face go calm in peace.  Awwww, that man. He loved to fight with me.  I think I was probably the only female in his world brave enough to not agree with his every word.  He knew I had a good heart but wasn’t gonna back down.  He use to call me his lawyer because when he needed something done or figured out, I was the one he would turn to to get it done.  He said I had a persuasive way. When we first met he questioned my ability to cook and doubted I could find my way around the kitchen.  I loved proving him wrong.  I think he thought of himself as somewhat of a master of the cocina, but the truth was he was seriously the salsa king.  I had to give it to him, his salsa rocked.  I would bring him empty jars all the time so he never had an excuse not to share his salsa with me.  He took such pride in making his salsa and would just gloat to everyone how great it was, and most of the time people had no other choice but to agree.   He would set up a bowl of his salsa, a slab of queso fresco, chopped up avocado cubes, and a pile of corn chips, and that combo was his snack.

I used to sit in his kitchen sometimes and watch him make it.  I’ve never tried to recreate his perfect salsa since he’s been gone, but I do think of him every time I make my own salsa.  I have to eat it the same way he did, with queso fresco (Mexican cheese), avocado, and chips.  This Calavera Queso Fresco Salsa Dip is my ode to that lovely grump Alfonso Lopez that I still love and I once knew.

Ingredients for Calavera Salsa Dip:

  • 1 – package Queso Fresco
  • 3 – tomatoes
  • 1 – tablespoon vegetable oil
  • 2 – jalapeños
  • 4- serrano chiles
  • 4 – fresh chile de arbol
  • 1 – onion (peeled and cut in half)
  • 4 – garlic cloves (peeled)
  • 1 – teaspoon vinegar
  • 1 pinch of dried oregano
  • salt and pepper
  • 2 – cups of water
  • avocado
  • corn chips
  • Pistachios, and chile flakes for decorating calavera

Directions:

  • Remove queso fresco from package, and with a small pairing knife cut the sides of the cheese to shape into a skeleton head.  Then with a small circle cookie cutter punch out the eyes. Place on a platter and place back in the fridge. Cut the edges of queso fresco to make a calavera shape Cut out the eyes for the calavera in the queso fresco
  • In a medium pot filled halfway with water over a high flame, bring to a boil.  Add in tomatoes and boil for 30 minutes.  Set to the side. Boil tomatoes for salsa
  • In a frying pan over a medium flame add vegetable oil and allow it to get hot.
  • Add in chiles, onion, and garlic cloves. Fry on all sides until charred and browned. IMG_5523 Fried chiles, onion and garlic
  • Remove stems from chiles, and place in the blender with tomatoes, onion, garlic cloves,  vinegar, oregano, salt, pepper, and water (I use the water the tomatoes boiled in). Blend until desired consistency is reached. Ingredients for salsa in blenderblended salsa
  • Decorate the calavera with chile flakes around the eyes, and use pistachios for the mouth. Decorate the queso fresco to look like a calavera
  • Place calavera shaped queso fresco on a plate, then pour the salsa  around the plate. Decorate the edges with avocado cubes.
  • Serve with chips. For Dia De Los Muertos Cacique Calavera Queso Salsa Dip
  • ENJOY!

IMG_5971

Im memory of my sweet friend Alfonso… I miss you.

Potato Pan De Muerto For Dia De Los Muertos

Potato Pan De Muerto For Dia De Los Muertos


Dia de los muertos calada and pan de muerto

Dia de los muertos couldn’t be celebrated without the age old tradition of pan de muerto. I am thrilled to make a beautiful potato version of this “bread of the dead” in honor of my beloved departed uncle. I will make two loafs…. one to eat, and one to decorate my home alter with. How will you celebrate Day of the dead? Watch my video below to see how easy it is to make this delicious bread. 

Ingredients for Potato Pan De Muerto:

  • 1 – package active yeast
  • 1/2 – cup luke warm water
  • 1 – teaspoon salt
  • 1/2 – cup sugar
  • 1 – cup mashed Idaho potatoes ( leftovers work best)
  • 1/2 – cup butter (softened)
  • 2 – eggs (beaten)
  • 3 – cups bread flour plus more for kneading
  • olive oil
  • Egg wash (1 egg and 1 tablespoon water whisked together)

Directions:

  1. Add yeast and water to a mixer, and allow yeast to activate for 10 minutes.
  2. Pour salt and sugar to the yeast mixture. Give it a good mix.
  3. Spoon in the mashed potatoes and break them up with a spoon if you need to. Then add in the butter and eggs. Mix to combine to hook attachment.
  4. Add in the bread flour, one cup at a time until the dough comes together and no longer sticks to the mixer about 5 minutes.
  5. Generously flour a clean work surface then knead dough until smooth.
  6. Grease a bowl with a little bit of olive oil. Place dough in greased bowl and turn it once inside to ensure the entire dough is well greased.
  7. Cover dough with a kitchen towel and let it rise for 2 hours.
  8. Remove towel and punch down the dough.
  9. Generously flour a clean work surface then knead dough again until smooth.
  10. Grease two 8 -inch cake pans and set to the side.
  11. Divide the dough into equal 3 parts.
  12. Place two of the parts in each cake pan, and reserve the additional part for decorating.
  13. Allow the dough to sit for an additional hour before decorating.
  14. Preheat the oven to 375 degrees Fahrenheit.
  15. With the extra part, roll the dough out to make bone decorations for the top of the loaf.
  16. Brush the top of the loaf with egg wash.
  17. Bake for 25 to 30 minutes or until golden brown.
  18. Enjoy!

potato pan de muerto


Idaho-PotatoesI would like to give a special THANK YOU to the Idaho Potato Commission for sponsoring this video. It is my absolute honor to work with you. 


I would also love to Thank my amazing crew.

Mando Lopez: Director/Editor

Tony Molina: Director of Photography

Jeshua Viveiros: Sound and the awesome calaca make-up artist – he used the Crafty Chica make-up line.

Earrings by ilaments Jewlery – Lisa Rocha!

Crock Pot Brownies And A CrockStar Contest

Crock Pot Brownies And A CrockStar Contest

Did you watch my video? If not… let me tell you what’s going on via this written post. I bought a Crock-Pot at Walmart (pisssst… they are so reasonably priced you should go get one too) and came home and wanted to use it. Something told me to look at the Crock Pot website… I did and stumbled upon this.

Crock-Pot is calling all CrockStars!!!!!

If you are a savvy slow cooking fan, the Crock-Pot brand is kicking off its annual Ultimate Crock-Pot CrockStar Contest. The winner will earn the title of “2014 Ultimate Crock-Pot Crock-Star,” plus $5,000 and be featured on Crock-Pot.com.

To enter:

Visit CrockStars.com between now and October 31st, 2014

Submit a 1-minute “video selfie” prepping your favorite original slow cooker recipe using a Crock-Pot Slow Cooker. Then text your original recipe.

Be sure to follow these and all contest rules noted on the site for eligibility!

Can you believe $5000 for a single recipe? I’m going to enter to win now. Will you? In the meantime just to get my feet wet I tried out a brownie recipe. Here is the easy recipe.

Crock Pot Brownies. So easy to make I'm sure my 5 year old can make them.

Crock Pot Brownies:

  • 12 – tablespoons butter (melted)
  • 1 1/3 – cups sugar
  • 2/3 – cup unsweeted coco powder
  • 1/2 – cup flour
  • 1 – tablespoon vanilla
  • 3 – eggs  (beaten)
  • 3/4 – cup semisweet chocolate chips

Directions:

  1. Line the bottom of a 7 quart crockpot with foil.
  2. Spray foil with a non-stick baking spray.
  3. In a bowl add butter, sugar, coco powder, flour, and vanilla together. Mix until combined and looks like a thick paste.
  4. Add in the beaten eggs and mix until completely incorporated.
  5. Fold in the chocolate chips.
  6. Pour the brownie batter into the foil lined crock pot, and cook on low for 3 and 1/2 to 4 hours  or until just a small bit of the center is still gooey.
  7. Serve a la mode while still warm.
  8. Enjoy!

Walmart-Moms-Disclaimer.2013

Cajeta Apple Peanut Butter Cake Inspired By Jodi Picoult’s New Book Leaving Time

Cajeta Apple Peanut Butter Cake Inspired By Jodi Picoult’s New Book Leaving Time

A cajeta peanut butter apple cake inspired by Jodi Picoult's book "Leaving Time."

I’ve been on a reading frenzy lately…. In the last couple of months I have thumbed my way through so many books, and have to admit it’s quickly becoming my favorite thing to do. It’s weird… I almost mourn the end of a book once I finish reading it, and go through this stage of what am I gonna do now? I suppose I’m saying it’s weird cuz heaven knows I have a ton of work and know exactly what I’m gonna do now.

A few weeks ago the lovely folks over at Walmart asked if I would be interested in reading an advanced copy of Jodi Picoult’s new book “Leaving Time.” I read the summary of the book and thought “that sounds interesting, yeah send it over.”

“Alice Metcalf was a devoted mother, loving wife, and accomplished scientist who studied grief among elephants. Yet it’s been a decade since she disappeared under mysterious circumstances, leaving behind her small daughter, husband, and the animals to which she devoted her life. All signs point to abandonment . . . or worse. Still Jenna–now thirteen years old and truly orphaned by a father maddened by grief–steadfastly refuses to believe in her mother’s desertion. So she decides to approach the two people who might still be able to help her find Alice: a disgraced psychic named Serenity Jones, and Virgil Stanhope, the cynical detective who first investigated her mother’s disappearance and the death of one of her mother’s co-workers. Together these three lonely souls will discover truths destined to forever change their lives. Deeply moving and suspenseful, Leaving Time is a radiant exploration of the enduring love between mothers and daughters”

The book arrived and I devoured it over the course of a few days. Let me tell you that description doesn’t even scratch the intensity surface of the story nor does it tell you that Jodi Picoult’s writing is near perfect. I was completely entwined in the characters and felt like I myself had become an elephant scientist. I learned so much about grief, patience, trusting your inner soul, and letting go. I highly recommend it to anybody in search of their next great read, and just wish there was more pages added to the story. I didn’t want it to end, because perhaps I wasn’t ready to let go.

In the book as the story unfolds I learned that when elephant keepers need to medicate an elephant they stick the medicine in the center of an apple and top it with peanut butter. When I was done reading the last page…. I couldn’t believe how amazing the end was. I got straight up off my couch and made this cake completely inspired by Leaving Time.

The book goes on sale tomorrow 10/14 and will be carried in all Walmart stores with a rollback that brings it to 40% off. I think you just found your new book.

A cajeta peanut butter apple cake inspired by Jodi Picoult's book "Leaving Time." It is an amazing read and the writing is near perfect. Read the book then make the cake.

Ingredients for Cajeta Apple Peanut Butter Cake:

  • 1/2 – cup cajeta or dulce de leche
  • 1 1/2 – honey crisp apples (peeled, cored, and sliced)
  • 1/3 – cup chopped pecans
  • 1/4 – cup butter (room temp)
  • 1/2 – cup smooth peanut butter
  • 3/4 – cup brown sugar
  • 3 – eggs
  • 1 – teaspoon vanilla extract
  • 1 – cup flour
  • 1 – teaspoon baking powder
  • 1/2 – teaspoon salt
  • 3 – tablespoons whole milk

Directions:

  1. Preheat oven to 325 degrees Fahrenheit.
  2. Spray a 9 inch glass pie dish with a non-stick baking spray.
  3. Pour cajeta into the base of the pie plate.
  4. Arrange apples in the cajeta then top with pecans. Set to the side.
  5. In a mixer cream butter, peanut butter and brown sugar together until fluffy.
  6. Add in eggs, and vanilla extract. Mix to combine.
  7. In a separate bowl sift flour, baking powder and salt together.
  8. Slowly add flour to peanut butter mixture. Mix until incorporated.
  9. Add in milk and mix until just combined.
  10. Pour peanut butter bater over cajeta apples.
  11. Bake for 40 minutes.
  12. Let cool for 15 minutes, then invert onto a serving plate.
  13. Serve warm and enjoy!

Walmart-Moms-Disclaimer.2013