Category: Foods for LENT

Tostadas De Guacamol Inspired By The Artist Ricardo Arjona

Tostadas De Guacamol Inspired By The Artist Ricardo Arjona

IMG_0963
I was recently assigned a job by Walmart to go review a show by the Guatemalan musical artist, Ricardo Arjona.  The show inspired me to run home and to make the classic Guatemalan dish, tostadas de guacamole.  More on that later;  back to the Ricardo Arjona show.  It wasn’t just any show, it was a show specifically for his true-blue fans.  The only way to get into the event was if you were in his fan club, or if were lucky enough, by winning tickets on a local radio program.

_MG_0213
What I realized about Mr. Arjona’s fan-base is that they are wildly-insane-crazy about him.  The first thing I saw as I got to the venue, The Mayan Theater in downtown Los Angeles, was the massive line of people that wrapped around the block so they could secure a good seat.  Then as I walked by the line, everybody was singing at the tops of their lungs, song after song by their aforementioned favorite singer.  Some fans even made signs to hold up once they got inside.  There was a lot of love everywhere.  It was a really sweet sight to see.


Once the show got underway, the fans roared in a frenzy as their hero hit the stage to sing the first song.  As fast on their feet and loud as they were, they quickly settled down so they could hear the music.

His setlist ran the gamut from his biggest hits to the newest songs.  The music itself was played in a stripped down, skeletal version, un-plugged if you will.  There was one acoustic guitar, a percussionist and Ricardo (sometimes on guitar or piano.)  It was a very simple set-up compared to the massive production for an artist of his stature.  It was very intimate.

_MG_0194 His voice sounded in top form and the band’s chops were equally good.  The banter to his fans between songs was genuine and charming.  He seemed delighted to be performing for the people that appreciate his music the most.

Ricardo is celebrating the release of his recently released CD titled, Viaje.  The rumor on the street is that he’s about to embark on a grand world tour.  You could buy the CD at Walmart!
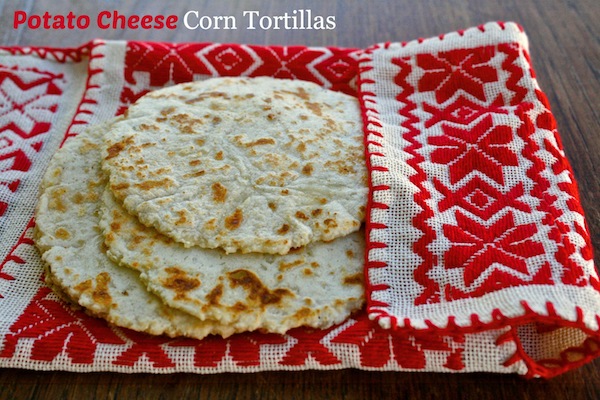
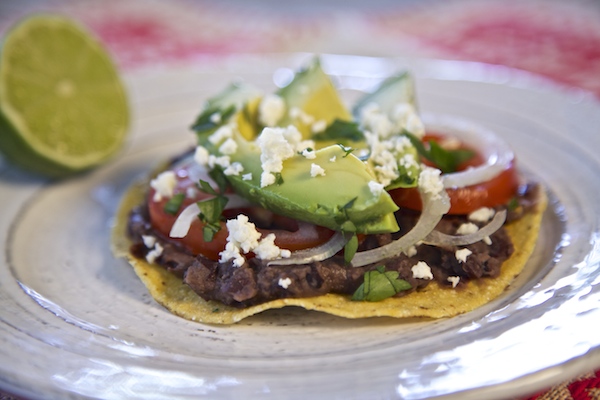
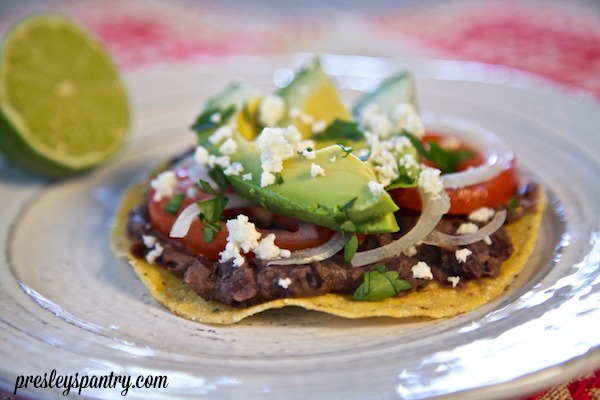
Like I said earlier, I was feeling moved by the show and realized that I didn’t have any Guatemalan dishes on my blog so I decided to make tostadas de guacamol.  Check out the simple recipe below:
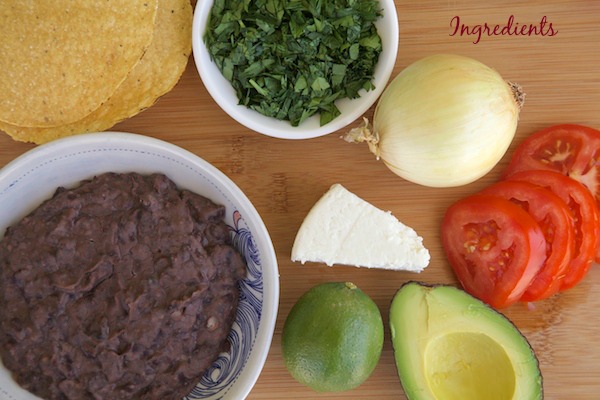
Ingredients for tostada de gaucamol:

  • ready made tostadas
  • refried black beans
  • tomato (sliced)
  • onion (sliced)
  • avocado (sliced)
  • cotija cheese (crumbled)
  • fresh oregano (chopped)
  • lime

Directions:

  1. Start with a tostada, and smear 2 tablespoons into the center.
  2. Layer a few slices of tomato, onion, and avocado.
  3. Crumble cheese, and sprinkle some oregano on top.
  4. Squeeze lime on top.
  5. Enjoy!

IMG_0955

Walmart-Moms-Disclaimer.2013

Cheesy Garlic Bread Made With Mama Francesca Parm

Cheesy Garlic Bread Made With Mama Francesca Parm

 Disclosure: This post is sponsored by Mama Francesca Cheese. However all opinions and the recipe are 100% my own.

Cheesy garlic bread made with Mama Francesca Parmesan Cheese

I think I have confessed here on my blog before that my family and I split ways when it comes to Italian food. For some reason they need to be coaxed into eating it. I have decided to stop this crazy nonsense of me sacrificing the flavors I love for them to be happy, when in reality they absolutely love it. Instead I am going full force ahead and serving everyday meals laced with Italian flavors. For instance, I have been serving bubbly cheesy garlic bread fresh out of the oven MF_logo_premcheese_blackwith our dinners at night, and NO ONE can resist it, especially me. I can’t just say it is the inviting warmth of the hot bread, I have to give credit to the incredible parmesan cheese I’ve been using: Mama Francesca. The premium cheese has really taken a front and center spot in my home since discovering it at Walmart a few weeks ago. Did I mention the price point can’t be beat for a cheese of this caliber? It taste great and is being used at least twice a week, not only by me but by my fiance too (and he’s a tough sell.) I have even managed to work the lovely Mama Francesca parmesan into my homemade salad dressings. Okay, it’s  become a permanent fixture on my grocery list and I don’t foresee it coming down. When you find something this good, you just can’t imagine living without it.

I’m really looking forward to the new Mama Francesca “The Tereztto” which will be  launching in Wal-Mart on 4/21/2014! Another way for me to keep making my meals feel more Italian!

Ingredients:

  • 1 – loaf french bread
  • 3 – tablespoons butter (room temperature)
  • 2 – tablespoons mayo
  • 3 – tablespoons Mama Francesca Parmesan cheese
  • 2 – tablespoons minced garlic

Directions:

  1. Preheat oven to 375 degrees Fahrenheit.
  2. Take loaf of french bread and slice it down the middle (creating to long slices of bread.) French bread for garlic bread
  3. Place butter, mayo, parmesan cheese, and minced garlic in a bowl.  Mix to combine.ingredients for cheesy garlic spreadMixed ingredients for cheesy garlic bread
  4. Evenly spread butter/parm mixture on each slice of bread.
  5. Place slices of bread on a cookie sheet.
  6. Bake in the oven for 15 minutes.
  7. Then place under the broiler for 3 minutes or until golden brown. Sliced cheesy garlic bread
  8. Cut and enjoy with a hearty meal.

Mama-Francesca-Cheese


Pin It!

Tracking Pixel

Easter Lemon Cake Trifle

Easter Lemon Cake Trifle

Trifle made for easter with lemon cake and peeps That’s pretty. I always have a desire to make or eat a trifle, but until recently I did not own a trifle bowl. I needed to correct that fast……

My fiance took it upon himself to start looking up places for me to buy a trifle bowl.  Every place was either online with shipping or out of the way, then he checked Walmart, not only is it close by but it was priced so nicely ($6. 97) I went out and bought it straight away.

As my grubby hands placed my new trifle bowl in the cart, I said to my son “We can’t leave here with out buying ingredients to fill this beautiful vessel to the rim.” I then asked “Do you want to make an Easter Trifle? We can decorate it with the new blue raspberry peeps, and a chocolate bunny.” My son looked at me and said excitedly “Can we get jellybeans too?” Me, being a pleased new owner of a trifle bowl, I said “Of course we can!” Then we ran like little kids do across Walmart to the Easter candy section and picked out our prized treats. The blue raspberry peeps didn’t make it all the way home, my son had to have them in the car, luckily I bought an extra pack of regular blue peeps.

ingredients used to make an Easter trifle

Ingredients for Easter lemon cake trifle:

  • 1 – 6 ounce box of strawberry jello mix
  • 1 1/2 – cups boiling hot water
  • 1 – 14 ounce can sweetened condensed milk
  • 1 – box Duncan Hines Lemon Supreme Cake mix (bake according to box instructions. Use egg, water, and vegetable oil)
  • 1 – box pink bunny peeps
  • 1 – large container cool whip
  • 1 – box of blue raspberry peeps / or blue peeps
  • 1 – bag Starburst jellybeans
  • 1 – Lindt chocolate bunny

Directions:

  1. In a large mixing bowl add in jello mix and hot boiling water. Mix with a fork or whisk until all jello is dissolved.
  2. Pour sweetened condensed milk into jello mixture. Mix to combine.
  3. Pour creamy jello mixture into the bottom on the trifle bowl. jello made for bottom layer of trifle bowl
  4. Place in fridge.
  5. Preheat oven to 350 degrees fahrenheit.
  6. Mix cake batter according to box (add in egg, water and oil) and bake.Duncan Hines lemon cake batter being poured into pan baked lemon cake still in pan
  7. Allow cake to cool. Remove from pan and cut into 1 1/2 inch cubes. Lemon cake cut into cubes for trifle bowl.
  8. Remove trifle bowl from fridge and start building your trifle. By alternating between the cubed cake and a bunny peep. Alternating between a piece of cake and a peep for an Easter trifle
  9. Then fill the entire center with cake cubes. Filling the center of a trifle with cubed cake
  10. Spread a nice thick layer of cool whip on top of cake.
  11. Then place another layer of cake on top of the cool whip. Close to being finished building a trifle
  12. Top with another layer of cool whip filling the trifle to the rim.
  13. Then decorate the top with blue raspberry peeps, jellybeans, and a chocolate bunny.
  14. Place back in the fridge till ready to eat.
  15. Enjoy!

Themed Easter trifle

Walmart-Moms-Disclaimer.2013


Parmesan Crisps In A Creamy Zucchini Soup

Parmesan Crisps In A Creamy Zucchini Soup

         Disclosure: This post is sponsored by Mama Francesca Cheese. However all opinions and the recipe are 100% my own.

Parmesan crisps in a creamy zucchini soup #mamafrancesca

I never seem to tire of cheese.  The thought of cheese excites me.  It makes me want to plan an entire meal around it or just slice it up with a cracker.  I run the gamut on the types I like and usually will hunt high and low for a specialty cheese.  Come on, does this really need explaining?  My logo to this blog is a little mouse.  That didn’t happen on accident.  I say it loud and proud,  “I’m a cheese girl!”

You can only imagine my utter delight when I happened to come across the premium MF_logo_premcheese_blackMama Francesca Cheese (available in a variety of flavors) at my local Walmart.  I nearly jumped for joy.  I adore parmesan cheese and it can sometimes be a little bit of a pain to find a nice one at an everyday market that’s affordable.  For some reason most people only think of parmesan cheese as a spaghetti topper, and forget to explore all the other wonderful things you can do with it.  I like to mix it into my mashed potatoes or make it into a pesto or encrust my chicken in it and fry it to a crisp, or simply make parmesan crisps out of it for soup or salad.  It doesn’t matter what you do it, as long as you buy it and eat it right away.

Ingredients for parmesan crisps and creamy zucchini soup:

  • 5 – tablespoons Mama Francesca cheese ( I used Perfetto flavor)
  • 1 – tablespoon olive oil 
    LIneup shot Mama Francesca
  • 6 – garlic cloves
  • 1/3 – cup leeks (chopped)
  • 9 – zucchini (chopped in rounds)
  • 1 – tablespoon dried basil
  • 1 – teaspoon chile flakes (the kind you use on pizza)
  • 1 – teaspoons Lawry’s seasoning salt
  • 1/2 – teaspoon black pepper
  • 1 – bay leaf
  • 4 – cups chicken or vegetable broth
  • 3/4 – cup 1/2 and 1/2

Directions:

  1. Preheat oven to 400 degrees fahrenheit.
  2. Line a cookie sheet with a baking mat.
  3. Pour 1/2 tablespoons of Mama Francesca cheese into little circle on the mat. Make sure they do not touch. parmesan cheese crisps #mamafrancesca
  4. Bake the cheese for 5 to 6 minutes or until golden crisp. baked parmesan cheese #mamafrancesca
  5. Set to the side to cool on baking sheet until ready to use.
  6. In a large pan over a medium flame add in olive oil and allow to get hot.
  7. Add in leeks and garlic and saute for about 2 minutes.
  8. Cut zucchini into rounds. I used a variety of zucchini. colorful variety of zucchini
  9. Then add in zucchini, dried basil, chile flakes, Lawry’s, black pepper, and bay leaf. Mix to combine. Continue to saute for about 5 to 10 minutes, or until the center of the zucchini starts to become translucent.
  10. Pour in the broth and bring to a boil.
  11. Boil the zucchini until fork tender for about 10 to 15 minutes.
  12. Then remove bay leaf from soup.
  13. Working in batches, pour 1/3 of the zucchini soup into a blender with 1/2 and 1/2. Blend until completely smooth/pureed.
  14. Pour smooth/pureed zucchini mixture into a bowl, and continue with the rest of the zucchini soup until all is pureed.
  15. Serve in a bowl hot and top with parmesan crisp and EAT IT!zucchini soup with a parmesan crisp #mamafrancesca
Potato Cheese Corn Tortillas

Potato Cheese Corn Tortillas

RevTorts

Have you ever tried corn tortillas made with mashed potato and cheese?  I never had and was thinking of how amazing these type of tortillas would be with a plate of beans or a bowl of rajas con queso or with a slab of butter.  Let me rewind and tell you where this insane train of thought is actually coming from.  I was thinking of the Mexican Revolution.  I know, where’s the bridge between the Mexican Revolution and corn tortillas? Let me explain how my wacky brain thinks sometimes.

The Mexican Revolution was a major armed struggle that started in 1910, with an uprising led by Francisco I. Madero against longtime tyrant Porfirio Diaz, and lasted for the better part of a decade until around 1920.  Over time the Revolution changed from a revolt against the established order to a multi-sided civil war with frequently shifting power struggles.  This armed conflict is often categorized as the most important social-political event in Mexico and one of the greatest overthrows of the 20th century, which saw important experimentation and improvement in social organization. 

Experimentation is always something I’m willing to delve into, which brings me back to my corn tortillas.  I am in no way trying to diminish the importance of the Mexican Revolution by comparing it with my tortillas.  What I am saying (tongue in cheek, of course) is that something that has come to be the normal for many many years,  like the beautiful corn tortilla for instance, can be re-made.  I’ve taken the classic corn tortilla and have blended it with mashed potatoes and cheese.  I know there are a lot of purists out there that would consider this food-blasphamy but the results are beyond interesting and delicious.

Check out my teeny, tiny tortilla revolution recipe and keep an open mind. Enjoy!


Ingredients for potato cheese corn tortillas:

  • 1 – cup of leftover mashed potatoes (can not be instant potatoes, has to be homemade)
  • 1 1/8 – cup corn masa flour
  • 1/4- teaspoon salt
  • 2/3 – cup water
  • 1/2 – cup grated cheese (I used queso quesadilla)

Directions:

  1. In a mixer add in leftover mashed potatoes, corn flour, and salt. Mix on medium until combined and the mixture becomes grainy.
  2. Add in water and mix to combine. The mixture will become a soft dough and should not be sticky. If sticky…. a tablespoon of corn flour one at a time.
  3. Add in the cheese and mix to combine.
  4. Divide the dough into 12 parts and roll into balls with the palm of your hands. _MG_1145
  5. Then using a tortilla press (or two books), line each side with a layer of plastic. Place a masa (potato corn tortilla mixture) ball in the center and press. This will flatten it and make it a perfect disk. _MG_1149 _MG_1157
  6. Place on a hot comal and cook on each side for 2 minutes or until slightly crispy. _MG_1169 _MG_1179
  7. Enjoy!


Papas Gratinadas: Mexican Potatoes Au Gratin

Papas Gratinadas: Mexican Potatoes Au Gratin

Disclosure: This post is sponsored by The Idaho Potato Commission. However; All opinions and recipe are 100% my own. Thank you to my Latina blogueras for their suggestions.

A few weeks ago, I was in New York as one of the top 100 blogueras of Latism. I was chosen along with 99 other Latina bloggers as one of the best Latina bloggers in the nation. We (all 100 0f us) were invited to the United Nations as part of our conference. We were there covering issues about education, health, business, and gender equality with top officials of the secretariat. While I was there I thought about potatoes and how they are so affordable and feed so many people. I remembered my trip to Idaho a year ago and decided to ask a few of my fellow Latina blogueras (Maura of The Other Side Of The Tortilla, Yoly of Savvy Mujer and Cuponeando, and Melissa of Hungry Food Love)  what they make with potatoes? I took what they said , then came home and made one of the suggested dishes. Check out the video below. Super fun, easy, and delicious…. three of my favorite things.

Ingredients for Papas Gratinadas:

  • 7 – Idaho Potatoes (peeled and boiled for 20 minutes)
  • 7 – anaheim chiles (roasted, peeled, and deseeded) (timesaver tip: buy them canned)
  • 7 – 1/2 inch slices of pepper jack cheese
  • 1 3/4 – cups of Mexican crema
  • 1 – onion (sliced)
  • 1 1/2 – cups sharp cheddar cheese (grated)
  • 1/2 – teaspoon chili flakes
  • 1 – teaspoon Lawry’s seasoning salt
  • 1/2 – teaspoon ground black pepper
  • 1 1/2 – cups pepper jack cheese (grated)
  • 10 x 8 casserole dish (spray sides with non stick spray)

Directions:

  1. Peel and boil potatoes for 20 minutes. Drain and set to the side.
  2. Cut potatoes into 1/2 inch slices. It’s okay of it becomes crumbly, you will use the crumbs too. Set to the side.
  3. Slice chiles down the middle and stuff with pepper jack cheese slices. Set to the side.
  4. Preheat oven to 350 degrees fahrenheit.
  5. Pour 1/4 cup of crema on the bottom of the casserole dish. Smooth it out with a spatula or the back of a spoon.
  6. Next place down a layer of potato slices.
  7. Top with stuffed anaheim chiles.
  8. Sprinkle the top of stuffed chiles with sliced onions.
  9. Pour in a 1/2 cup of Mexican crema over the top of onions.
  10. Generously sprinkle the top of the crema and onions with cheddar cheese.
  11. Next srinkle in chili flakes, Lawry’s, and ground pepper.
  12. Add another layer of Idaho potatoes.
  13. Then add in another 1/2 cup of crema.
  14. Top with remaining potatoes and another 1/2 cup of crema.
  15. Finish the whole casserole layering with a 1 1/2 cups grated pepper jack cheese.
  16.  Bake in the oven for 50 minutes, then place the casserole dish on the top shelf of oven under the broiler (on high) for 3 to 5 minutes, or until golden crisp.
  17. Let cool for 20 minutes before serving.
  18. Enjoy!


The Mexican Candy Guide!

The Mexican Candy Guide!

Does this picture excite you with the idea of Mexican candied fruits and a little candy on the side?  I placed my candy guide on Babble.  Click here to see the complete list of all my favorite goodies.